I nearly lost my entire home server
2025-03-04
Around the first week of January, I said goodbye to my family in Korea and got on a flight back to the US to continue my studies. The flight itself was quite uneventful, and I enjoyed a couple of movies I’d brought on my phone and played games on my Steam Deck. But I don’t like long-haul flights in general because all the shaking around makes it impossible to get any sleep and the noise-canceling headsets can only cut out so much engine roar.
As the plane touched down and taxied to the gates, I toggled off airplane mode and watched the flurry of notifications and activity as the phone synced with the world after 13 hours of disconnect. I didn’t see anything noteworthy, so I grabbed my bags and got off with the others.
I went through the visa check, picked up my bags from the carousel, and headed to the multi-modal facility where all the buses were. While waiting for the tram system to come by, Pushover suddenly chimed on my phone. I immediately knew it was not a good sign because that ping sound was configured for critical alerts.
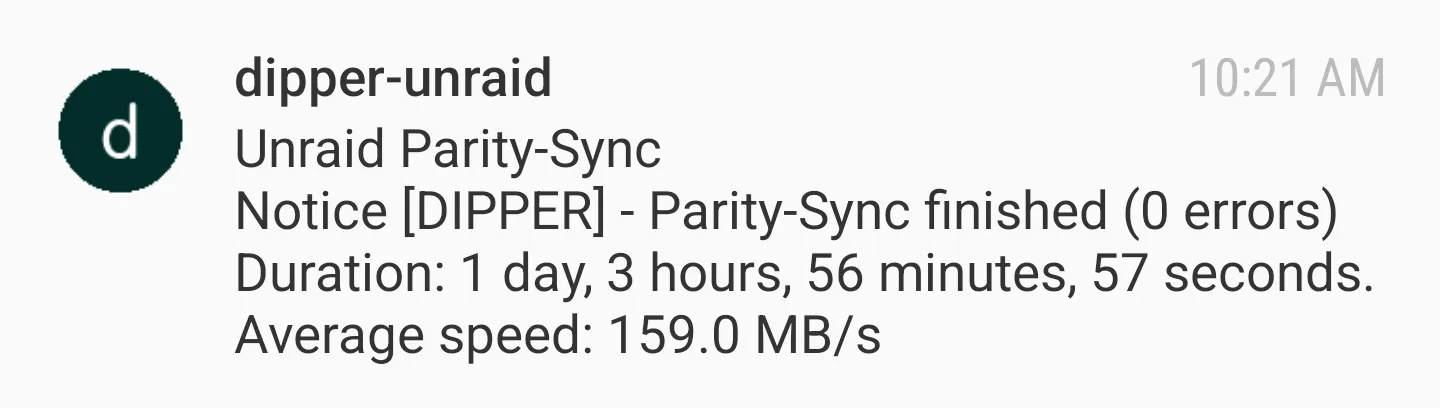
Sure enough, I was greeted by this, after 13 hours of torture on a flight:
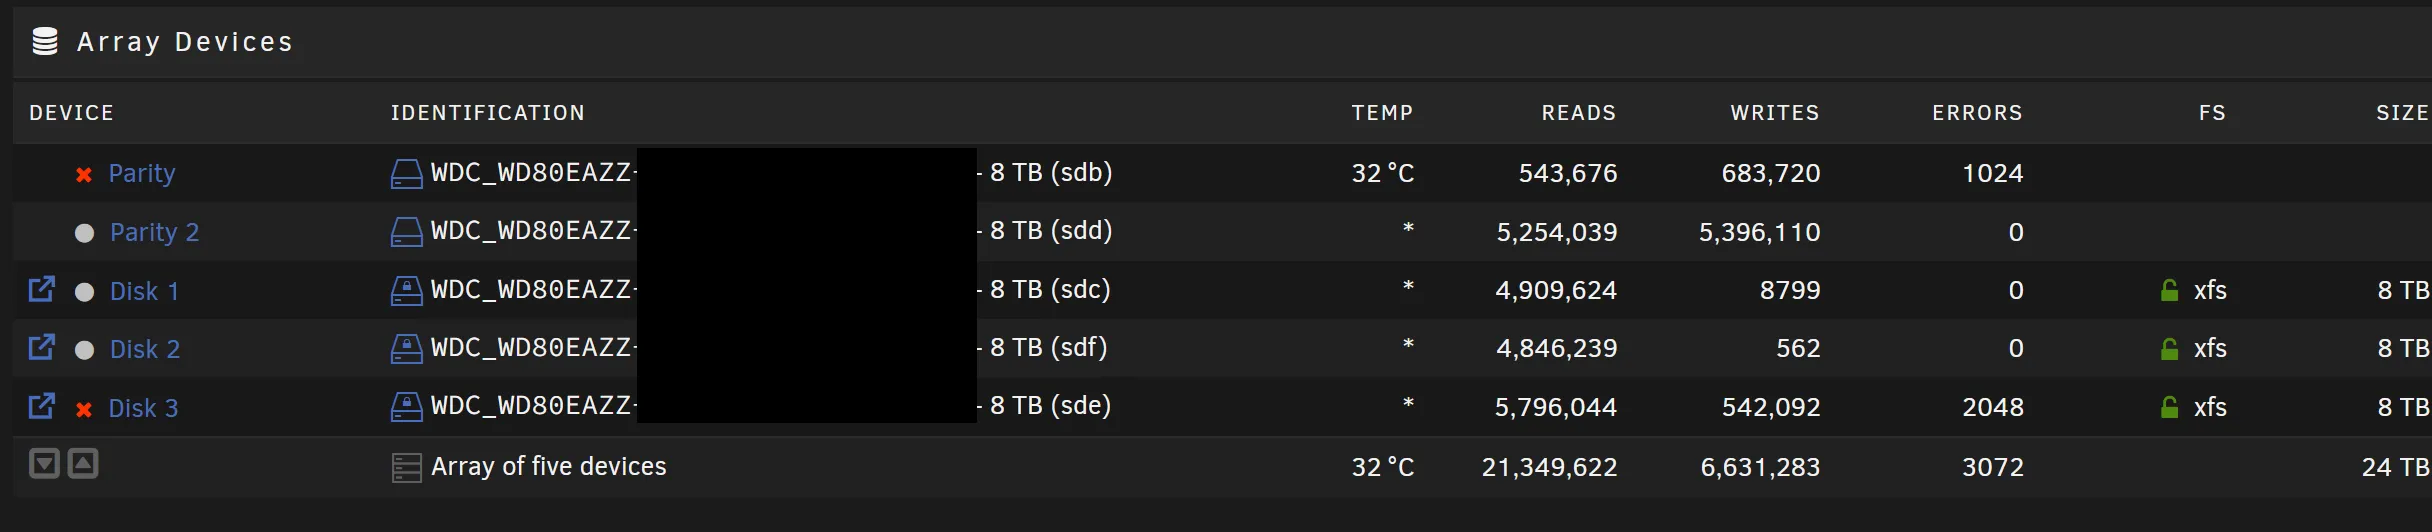
My first thought was: why did this have to happen after I’d come all the way to the US?! Answer: Murphy’s Law. Second thought was: thank god for dual-parity. I thought it was overkill when I initially configured my array that way, but now it was evident that I’d missed total catastrophe by a very slim margin.
I thought it was strange that two drives dropped off of the array at the same time, but didn’t think much of it at the time. (Foreshadowing.) While the drives there were a mix as I bought the drives in batches, there could’ve been a time when I bought two in a single batch. Perhaps it was a manufacturing defect.
At any rate, I ordered up two 16 TB replacements and took the server offline to prevent any more reads and writes from taxing the other drives and causing them to fail. The server would be unavailable, and my family would be mad at me, but it was better than creating a worse situation where I’d have to reconstruct the server from scratch.
Now, conforming to best practices, I do have a backup server with a replica of the data on the main server. However, because I wanted to tackle two birds with one stone, the backup server was located offsite, so the schedule for backing up ran every day during the early hours when everyone was asleep, and it was constrained by Internet bandwidth between the two sites. Depending on when the last backup was, it was possible that it didn’t have all the bits of the latest copy on the main server, and at any rate, it was going to be a painful affair trying to restore around 18 TB of data over the Internet.
So the drives arrived, I got them installed with help from my family, the server resilvered and everything was right with the world, right?
An ideal world where everything goes right
When the new hard drives arrived, I got on a video call with my family members and instructed them on how to change the drives. It was slightly tricky because the case I used for the main server, the Jonsbo N1, required you to slide the server out of the main case rail and replace the drives. This was a finicky process, because the server was in a media cabinet and that meant you had to take out the entire server and delicately disconnect cables and make sure you didn’t drop it and kill the rest of the drives.
But we managed to get it done, and I booted the server up and started the rebuild process. I opted to skip the preclearing process, because there was no way the brand-new drives were faulty, right?
The new drives are… faulty?
Unfortunately, the new drives immediately threw up the exact same I/O errors a minute into resilvering. One dropped off from the system entirely, just like the 8 TB one from the two original drives that “failed”. smartctl couldn’t detect the drive that went AWOL:
Smartctl open device: /dev/sde failed: INQUIRY failed…and gave tons and tons of errors for the other drive, even though all the SMART attributes looked healthy and the drive was deemed okay by SMART standards:
Error 385 occurred at disk power-on lifetime: 20508 hours (854 days + 12 hours)
When the command that caused the error occurred, the device was active or idle.
After command completion occurred, registers were:
ER ST SC SN CL CH DH
-- -- -- -- -- -- --
04 61 02 00 00 00 a0 Device Fault; Error: ABRT
Commands leading to the command that caused the error were:
CR FR SC SN CL CH DH DC Powered_Up_Time Command/Feature_Name
-- -- -- -- -- -- -- -- ---------------- --------------------
ef 10 02 00 00 00 a0 08 01:08:16.785 SET FEATURES [Enable SATA feature]
ec 00 00 00 00 00 a0 08 01:08:16.785 IDENTIFY DEVICE
ef 03 46 00 00 00 a0 08 01:08:16.785 SET FEATURES [Set transfer mode]
ef 10 02 00 00 00 a0 08 01:08:16.784 SET FEATURES [Enable SATA feature]
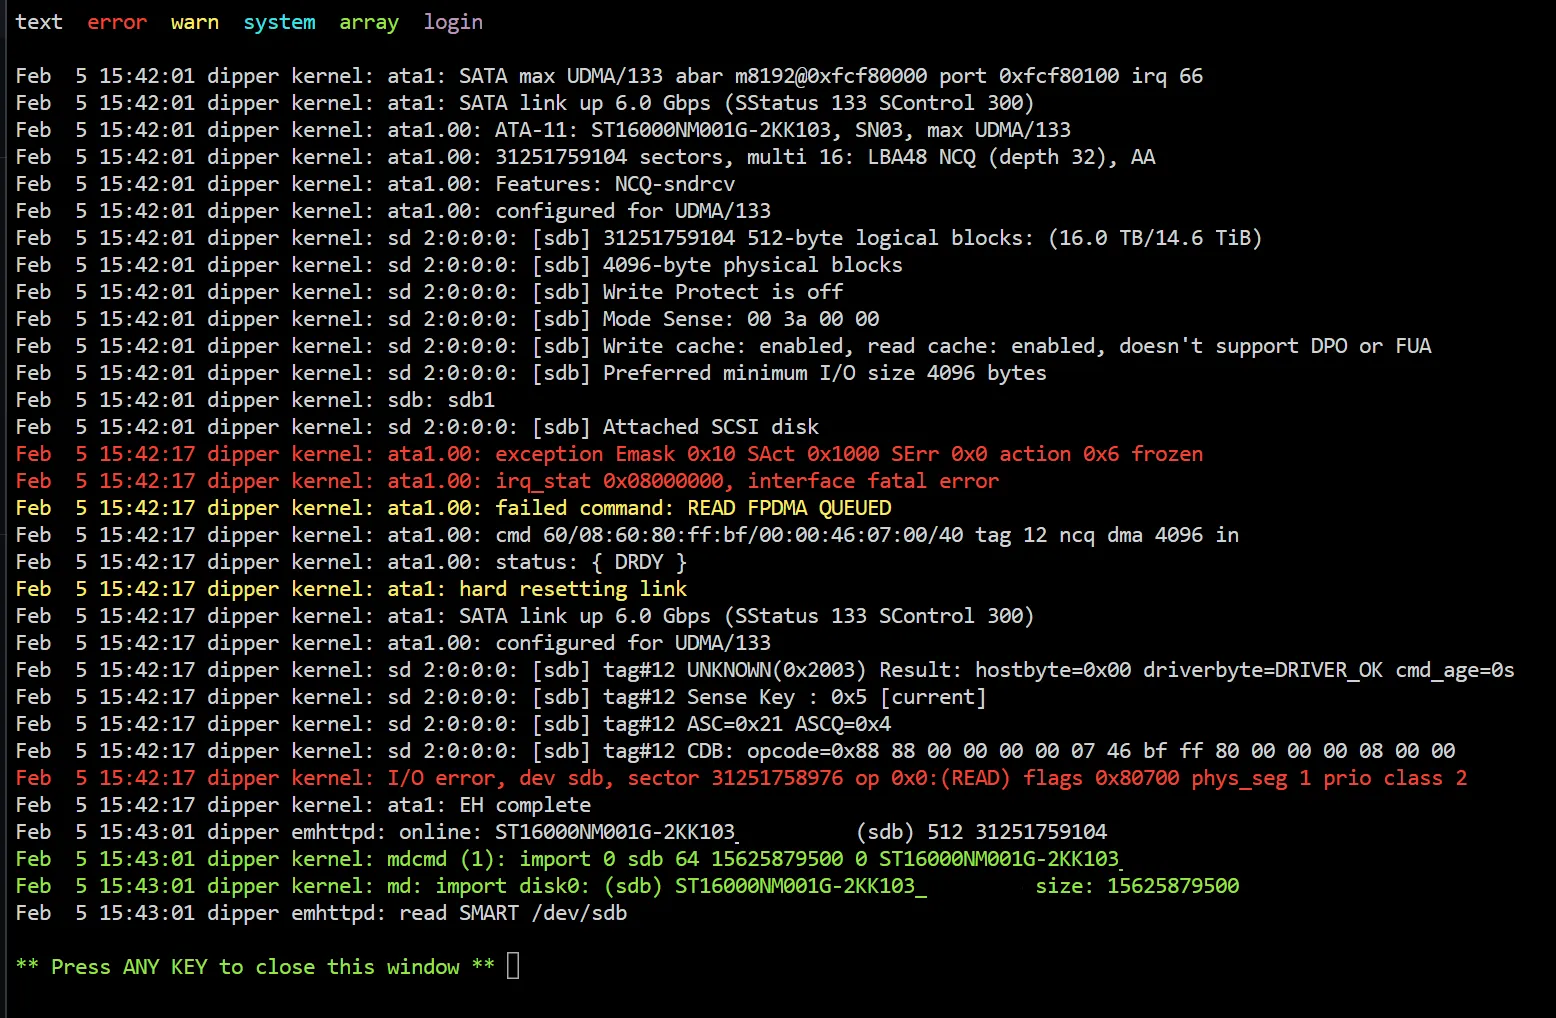
ec 00 00 00 00 00 a0 08 01:08:16.783 IDENTIFY DEVICEdmesg showed more cryptic and sinister errors:
20:28:04 dipper kernel: ata2.00: configured for UDMA/133 (device error ignored)
20:28:04 dipper kernel: ata2: EH complete
20:28:04 dipper kernel: ata2.00: exception Emask 0x0 SAct 0x0 SErr 0x0 action 0x0
20:28:04 dipper kernel: ata2.00: irq_stat 0x40000001
20:28:04 dipper kernel: ata2.00: failed command: WRITE DMA EXT
20:28:04 dipper kernel: ata2.00: cmd 35/00:c8:e0:a3:05/00:01:00:00:00/e0 tag 19 dma 233472 out
20:28:04 dipper kernel:         res 61/04:c8:e0:a3:05/00:01:00:00:00/e0 Emask 0x1 (device error)
20:28:04 dipper kernel: ata2.00: status: { DRDY DF ERR }
20:28:04 dipper kernel: ata2.00: error: { ABRT }
20:28:04 dipper kernel: ata2.00: failed to enable AA (error_mask=0x1)
So I had to dig deeper. There was no way that the new drives were faulty in the exact same way as the old drives, and both of them at that.
Going down the chain
The first thing was to figure out if the drive bays were going bad. I video-called with my (frustrated) brother and had him swap around drives in the bays.
However, after swapping, the problems followed the drives. This was a real head-scratcher. If the drives weren’t faulty, then something down the chain was the problem. But how come the problems followed the drives across bays if the drives themselves weren’t faulty?
I asked and checked to make sure that all the connections were firmly seated. This was quite the ordeal, because it’s really hard to tell whether a connection is “good” over a grainy video call. My brother did note that one of the Molex connectors that went to the SATA backplane of the Jonsbo N1 was slightly loose when he went to push it in, so I was hopeful that perhaps it was a power issue. The failure probably followed the drives because they were the most susceptible to brownouts, and the fact that the new drives were now much bigger in capacity than any other drive in the system supported the hypothesis that they were the first ones to quit when the power was insufficient and throw errors.
Unfortunately, this managed to throw me off the scent temporarily. Even the preclearing process seemed to work fine, so I canceled the preclear and started the rebuild. However, a minute into the rebuild, the same freaking problem returned.
I had to move further down the chain. My suspects, in order from the drive to my screen thousands of kilometers away, were the following:
- SATA backplane
- The SAS to SATA (1x4) breakout cables (SFF-8087)
- The LSI RAID card, flashed into IT mode, acting as the HBA
- The actual motherboard itself
- The PSU
- Me, I was going insane and this was all a hallucination
Of particular note was the breakout cable.
History repeats?
See, while seeking help on the UnRAID forums, I came across a post that I wrote in 2023, where I had two drives die on me after an UnRAID upgrade.
Wait, two drives? Like, what I’m going through right now?
This was back in June 2023, and I happened to be on a trip to Beijing, so I didn’t have physical access to my server. Thankfully, that particular trip ended after 2 weeks, and I was able to fly back to Korea and diagnose further, and it turned out to be the SAS to SATA cable going bad.
For context, the Jonsbo N1 case is a mini-ITX case, so the insides are very, very cramped. So much so that a SAS cable sticking out the side has to be bent around to fit in the case. I even tried using a right-angle, 90-degree cable, but you still needed a bend to route the cable through to the area where the SATA connectors on the backplane were. Making matters worse, the SATA ends had to be right-angled, too, or else they’d snap off when the server was slid back into the outer casing and Jonsbo would void your warranty. And it’s hard to find sellers that will sell a cable that has both a 90-degree bend at the SAS end AND the SATA ends.
I’d replaced the cable and the drives had all spun back up again with zero problems. Until now, of course.
”Supply chain issues”
I decided to replace both the HBA card and the breakout cable in one go, so that if either one turned out to not be the culprit, I wouldn’t have to wait longer to get another shipment. Plus, it was not that expensive — a used card on AliExpress only cost about $30, and the cable only added a bit more to the total.
Unfortunately, it was the worst possible timing to be shopping for replacement server parts. Because of the Chinese Lunar Year holiday, a lot of the AliExpress sellers were taking off days, for the entire week and then some. This meant that by the time the parts made it out of their warehouses and got shipped in a boat from China to Korea it would be mid- to late-February, which meant we’d be without our server for an entire month.
While researching options, I came across those PCIe to SATA cards, with chipsets from ASMedia. They served essentially the same purpose as the HBA card — why couldn’t I use them?

I thought I’d read something about avoiding those cards since they tended to drop the drives whenever the load increased and were generally unreliable, but it turned that I was thinking about those SATA port multiplier cards, which had Marvell chipsets and were best avoided at all costs. Regular PCIe to SATA cards seemed to be fine, though it looked like the cards based on the ASM1166 chipset needed a simple firmware update for it to work properly. But compared to an LSI HBA card, that wasn’t that big of a deal, since you needed to flash the firmware on LSI cards to get them into IT mode anyway. And the price was an absolute bargain — I paid perhaps $10 for the card, and like $2 for a 12-pack 90-degree SATA cable set, which was cheaper than the LSI option by half as much.
So I picked up a card with the ASM1066 chipset from AliExpress, which immediately shipped because it came from AliExpress’s warehouses, and they seemed to ignore holidays. (The joys of capitalism.) Unfortunately, the port at Pyeongtaek (평택) that screened the packages for customs did not, so I only got the card during the first week of February, which was still way better than the expected ship date for the LSI card.
When the card arrived, we discovered that it was absolutely perfect. It took up much less space than the previous LSI card, and the ports were angled towards the front of the case where the hard drives were, so there was absolutely zero bend or pressure on the SATA cables, which meant they wouldn’t fail that way.
Once we got everything hooked up, the server was powered back on, the drives came back, I was able to start the resilvering process, and it was a happy ending, right? Right?!
The Server of Theseus
What do you do when you’ve replaced virtually everything about the server… and you still get slapped in the face with:
This was bad. Somehow, the problem persisted, even when I had:
- Replaced the hard drives with brand-new ones
- Replaced the RAID card with a brand-new SATA card
- Replaced all the SATA cabling between the card and backplane
- Randomized the order of the hard drives connected to the backplane so as to rule out a bay issue
Out of ideas, I asked for help on the UnRAID forums again, since I had no idea where those ATA errors were coming from. @JorgeB on the forums said that the errors still looked like a connection problem, particularly on the power side.
Unfortunately, I didn’t have a spare PSU to test, but I had an idea. I called in and asked my brother to move the Molex connectors one row down, to see if perhaps the length was the issue. (By one row down, I mean the Molex cable was one long cable with four Molex plugs wired in parallel, and I was using the two outermost ones furthest away from the PSU.)
He had one hell of a time getting the cable out of the connector because the connector on the backplane was in a hard-to-reach spot. I also wondered whether heat had deformed the connector, making it harder to remove and potentially causing an imperfect contact between the pin and connector. Unfortunately, I couldn’t tell over the grainy video call, and the photos didn’t help much, either.
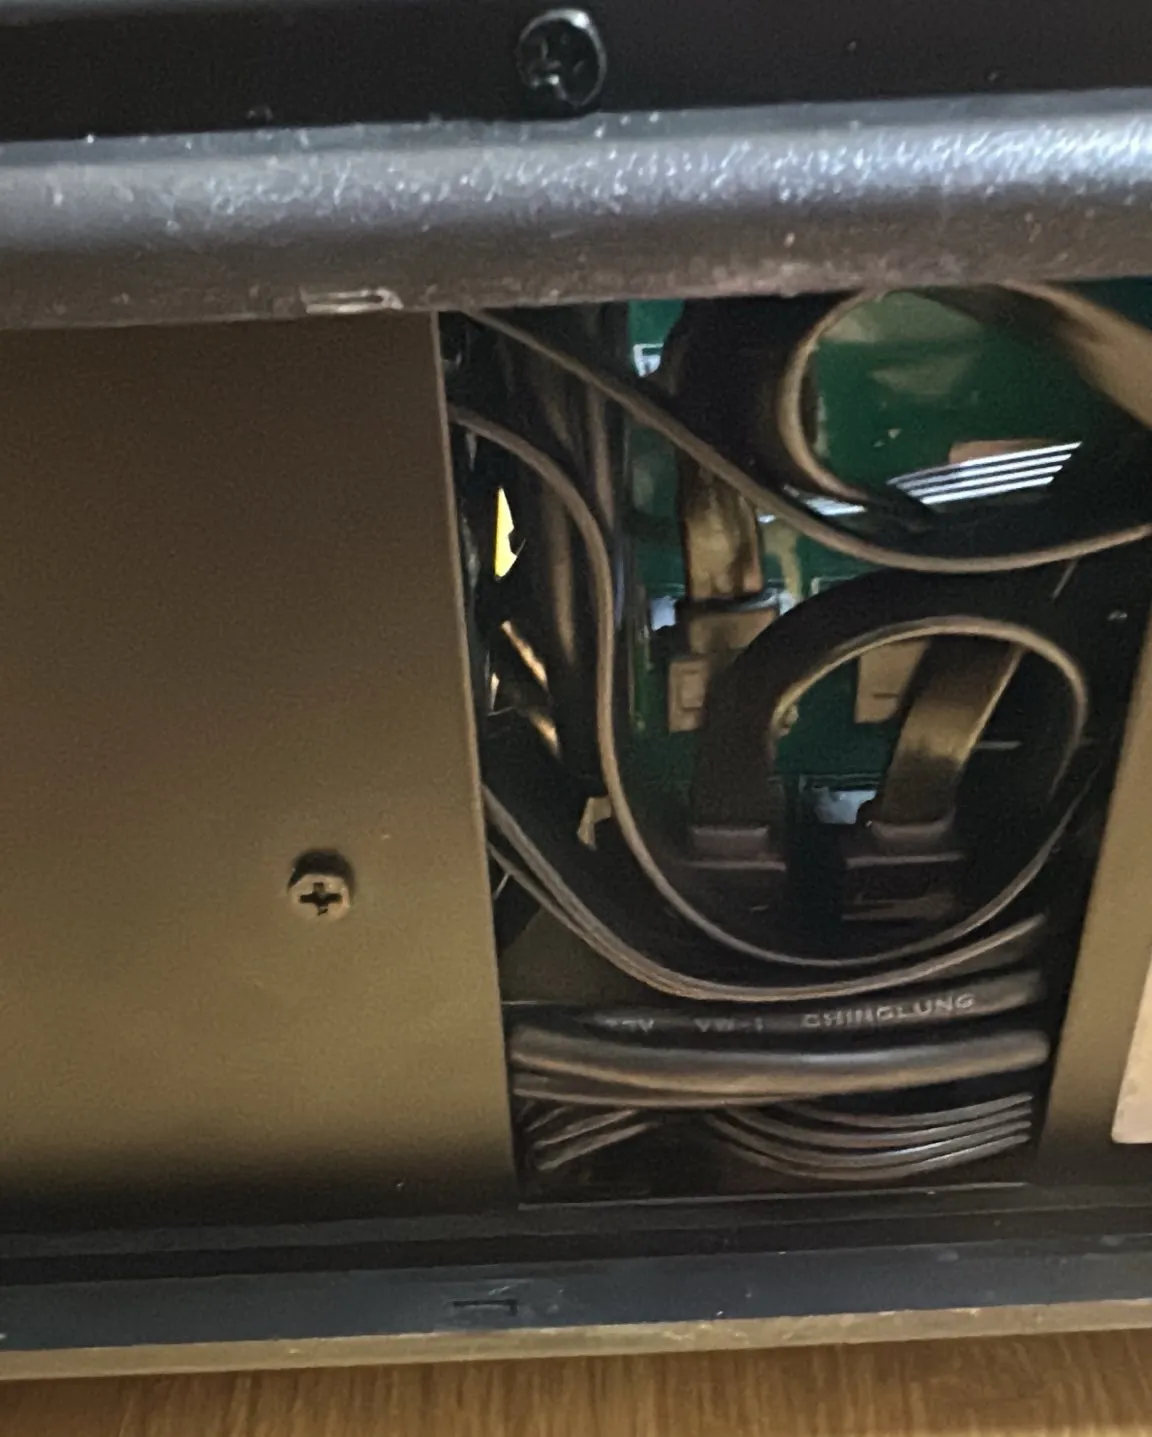 |
|---|
| Can you make out the 4-wire Molex cable underneath the thick cables marked ‘ChingLung’? |
Finally, once the server was reassembled for the umpteenth time, he powered on the system and I started a preclear to see if the I/O issues had gone away.
Jumping over the first hurdle
UnRAID’s pre-clear system is comprised of five different stages, but only three of them are the ones that access every single byte on the drive. And unfortunately (or fortunately?) for me, the drives that I was preclearing were 16 TB in size.
It was a long and agonizing wait, but I decided to wait it out, because I didn’t want to risk another failure while rebuilding the array because of some latent power issue that decided to manifest again. So I let it run, and checked in periodically to monitor the progress.
Each stage took around 20 hours to complete — 20 hours to either read or erase every single byte of the 16 TB drive.
But thankfully, the preclear passed after running for a bit over 62 hours:
####################################################################################################
#                              Unraid Server Preclear of disk _____JFA                             #
#                            Cycle 1 of 1, partition start on sector 64.                           #
#                                                                                                  #
#   Step 1 of 5 - Pre-read verification:                  [20:44:44 @ 214 MB/s] SUCCESS            #
#   Step 2 of 5 - Zeroing the disk:                       [20:46:40 @ 213 MB/s] SUCCESS            #
#   Step 3 of 5 - Writing Unraid's Preclear signature:                          SUCCESS            #
#   Step 4 of 5 - Verifying Unraid's Preclear signature:                        SUCCESS            #
#   Step 5 of 5 - Post-Read verification:                 [20:44:42 @ 214 MB/s] SUCCESS            #
#                                                                                                  #
#                                                                                                  #
#                                                                                                  #
####################################################################################################
#       Cycle elapsed time: 62:16:35 | Total elapsed time: 62:16:36                                #
####################################################################################################

####################################################################################################
#   S.M.A.R.T. Status (device type: default)                                                       #
#                                                                                                  #
#   ATTRIBUTE                   INITIAL CYCLE 1 STATUS                                             #
#   Reallocated_Sector_Ct       0       0       -                                                  #
#   Power_On_Hours              3       65      Up 62                                              #
#   Reported_Uncorrect          0       0       -                                                  #
#   Airflow_Temperature_Cel     28      41      Up 13                                              #
#   Current_Pending_Sector      0       0       -                                                  #
#   Offline_Uncorrectable       0       0       -                                                  #
#   UDMA_CRC_Error_Count        0       0       -                                                  #
#                                                                                                  #
#                                                                                                  #
####################################################################################################
#       Report genereated on: February 08, 2025 at 13:00:38                                        #
####################################################################################################
--> ATTENTION: Please take a look into the SMART report above for drive health issues.

--> RESULT: Preclear Finished Successfully!
And a short while later, the second 16 TB disk precleared successfully, giving me some hope back:
####################################################################################################
#                              Unraid Server Preclear of disk _____DA5                             #
#                            Cycle 1 of 1, partition start on sector 64.                           #
#                                                                                                  #
#   Step 1 of 5 - Pre-read verification:                  [21:27:40 @ 207 MB/s] SUCCESS            #
#   Step 2 of 5 - Zeroing the disk:                       [21:30:35 @ 206 MB/s] SUCCESS            #
#   Step 3 of 5 - Writing Unraid's Preclear signature:                          SUCCESS            #
#   Step 4 of 5 - Verifying Unraid's Preclear signature:                        SUCCESS            #
#   Step 5 of 5 - Post-Read verification:                 [21:27:42 @ 207 MB/s] SUCCESS            #
#                                                                                                  #
#                                                                                                  #
#                                                                                                  #
####################################################################################################
#       Cycle elapsed time: 64:26:28 | Total elapsed time: 64:26:28                                #
####################################################################################################

####################################################################################################
#   S.M.A.R.T. Status (device type: default)                                                       #
#                                                                                                  #
#   ATTRIBUTE                   INITIAL CYCLE 1 STATUS                                             #
#   Reallocated_Sector_Ct       0       0       -                                                  #
#   Power_On_Hours              3       67      Up 64                                              #
#   Reported_Uncorrect          0       0       -                                                  #
#   Airflow_Temperature_Cel     28      41      Up 13                                              #
#   Current_Pending_Sector      0       0       -                                                  #
#   Offline_Uncorrectable       0       0       -                                                  #
#   UDMA_CRC_Error_Count        0       0       -                                                  #
#                                                                                                  #
#                                                                                                  #
####################################################################################################
#       Report genereated on: February 08, 2025 at 15:10:38                                        #
####################################################################################################
--> ATTENTION: Please take a look into the SMART report above for drive health issues.

--> RESULT: Preclear Finished Successfully!
Rebuilding
The rebuild process was slightly more complicated than it had to be, because I’d opted to get drives of a bigger capacity to replace the “failed” ones.
Now, UnRAID won’t let you have a data drive that is bigger than the parity drive, and the amount of available storage is just the sum of all the data drive capacities, which meant I wouldn’t have any extra storage space available right now by swapping out two out of the five 8 TB drives in my array with 16 TB ones. It just meant that I’d have to assign them as parity drives, and in the future if I ever got a drive that was bigger than 8 TB (but less than or equal to 16 TB, because of the parity drives) to replace one of the data drives then I’d see the increased storage space. As for now, it was mostly future-proofing.
Unfortunately, one of the two drives that had failed was a data drive, and as I mentioned earlier, UnRAID wouldn’t let you have a data drive bigger than a parity drive, even if you wanted UnRAID to only use the first 8 TB and use the rest later once all the parity drives were upgraded.
Thankfully, UnRAID has a special “parity-swap” procedure for instances like these: you assign the new drives as parity drives, and then move the other 8 TB parity drive into one of the data drive slots (where the failed data drive used to be). Then UnRAID recognizes that you’re trying to copy the parity data from the old drive to the new, and then rebuild the data drive on top of the old parity drive.
I assigned the drives and clicked the copy button to start the process. The array isn’t accessible during the copy step, but I was fine with that as long as it didn’t crash during the procedure. My server had one final scare up its sleeve, though, just to get a last laugh:
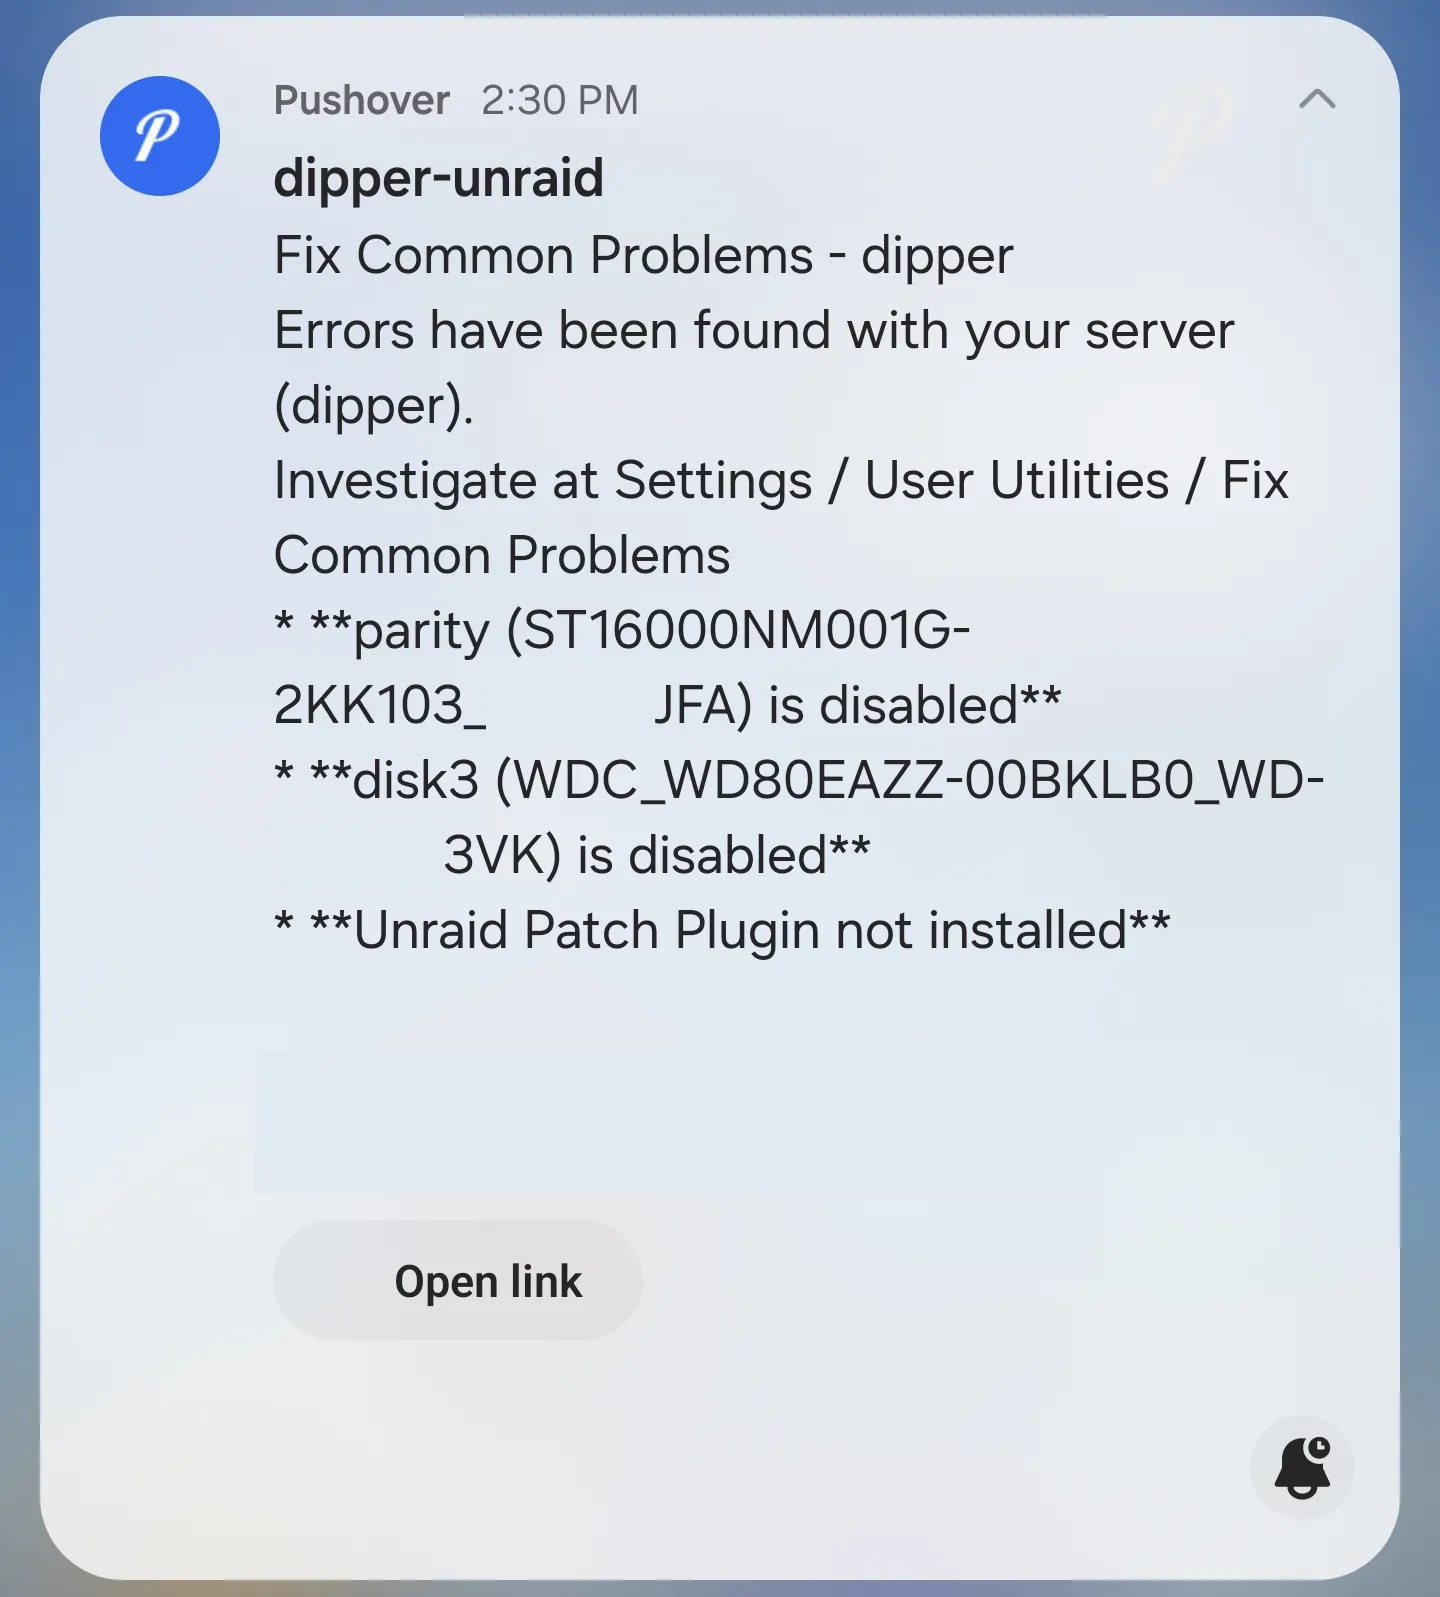
This was just the “Fix Common Problems” plugin telling me that my array was already in a degraded state, but when I saw the “Errors” part I instantly thought the drives had dropped out again due to another brownout or something.
Thankfully, nothing of that sort happened, and the parity-swap finished successfully after several hours. It actually took longer than each preclear step, probably because the 8 TB also slows down near the end, and we need the data from the 8 TB drive to populate the 16 TB one.
I then kicked off the data and parity drive rebuild process, which could be done in one go. This took the longest, clocking in at 27 hours (!), but mercifully it passed as well:
And with that, the server was finally brought back online after 28 days, concluding the outage.
Failure Analysis
Given that futzing around with the Molex connector temporarily resolved the problem the first time around and permanently resolved it in the end, we can focus on the power-side of things.
First, in terms of wattage, I was well within the specs of the system. The power supply was a SP750 model from Lian Li, and from what I can tell with the system specs, the most I ever needed with the parts in the NAS was perhaps 380 W. That is half of the rated wattage of the PSU, so a failure of it was rather unlikely.
That left the single cable, which was carrying all the power to the backplane. When I first built this system, this was the only option, because Jonsbo’s backplane only had the two Molex ports, and also because Lian Li decided to only ship one Molex cable in their entire set of detachable cables.
But did I overdrive the cables to the point of them failing? Well, let’s do some math.
For starters, here are the specifications sheets for the two model types of the drives that I have in my NAS:
As previously mentioned, I have two 16 TB drives, and three 8 TB drives. Seagate’s specs say the maximum operating wattage of the drives is 10 W for each drive, although it doesn’t list the start-up peak power, which would probably be higher than 10 W. WD does list the peak amperage of the 12 V rail at 1.75 A, giving us around 21 W of peak start-up power. WD also mentions that the average power requirements for read and write is about 6.2 W. Scaling that up to Seagate’s power requirements linearly suggests that Seagate’s peak startup wattage is about 31 W, so we’ll assume it is around that number.
This means that during startup, the drives in my NAS draw about 125 W, and during normal use with all drives spinning at once, the average power draw should be around 38.6 W.
According to a forum post on LTT, a single Molex cable should give me 120 W of power on the 12 V rail, which means I briefly exceed this rating upon starting up the server by about 5 W. But again, this is with us assuming that the peak startup wattage for the Seagate drives scales linearly from WD’s specifications, which is probably not the case. And during normal use, the power usage is well below the maximum capability of a typical Molex cable.
So here’s my hypothesis on what happened. This server has been running non-stop since June 2022, which means it has been operational for nearly 3 years at this point. During the time, perhaps the load on the cable was slightly over the rated limit, causing slight amounts of heat to deform the connector and cause imperfect contact on the pins. Paired with the vibrations from the hard drives sitting directly on top of the backplane, the cable kept creeping out of the connector until at some point, the voltage sag from the imperfect contact was just too much for some of the hard drives to handle, and the most sensitive ones began to drop off from the server, causing the I/O errors.
When the Molex plugs were moved one row over, the new plug was still in good condition and was able to make better contact with the backplane connector.
There was one chance where I could’ve suspected this and have avoided the hassle of waiting for the new parts to arrive. The fact that two drives dropped out at the exact same time should’ve clued me into the fact that this was no drive failure. Even if they were from the same batch, drives don’t just up and die from the array in the same precise moment like that, due to manufacturing variations. Of course, this is all in hindsight, so I guess it’ll serve as a reference in the future if it ever happens again.
Lessons learned
Unfortunately, if my hypothesis is correct, this is still a temporary solution. If the wattage is exceeding the cable specs by only a little, it would still work for maybe a year or two before developing the same problems.
To solve this for good, I’m planning to buy and install two separate Molex cables from the PSU to the backplane, with the highest wire gauge I can obtain so that more power can be delivered over less resistance. This should help with the marginal heat generated, if any.
But thankfully, the home server is finally back up, and ultimately I did not lose any data from this incident or have to restore from a backup. The redundancy part of my server functioned exactly as I planned.
To reduce the downtime from waiting for parts next time, I plan to have at least one spare hard drive available as well. Since the Jonsbo N1 only houses 5 drives at once and I use all of the bays for the array, that means the drive will have to be a cold spare, but it’s faster than waiting weeks for the drives to arrive from China or wherever.
(Note: I don’t think having more than one spare is a good idea, for a couple of reasons. Drives historically have become cheaper over time, and I still stand by the fact that the chances of two or more drives failing at once is extremely slim. And yes, I do realize the irony while writing this blog post, but again, this was not a problem with the actual hard drives, and if I had started with the cabling then I could’ve gotten away with purchasing no drives at all.)
So there you go — if you’re chasing random I/O errors that seem to haunt you across different hardware, hopefully you can also fix it by closely inspecting the power situation of your system, and making sure that all the connectors tightly fit the inserted plugs!