ffmpeg: convert HDR to SDR
December 14, 2022
Warning: this page is older than 365 days. The content may be out-of-date.
(Warning to mobile users: this post has a lot of images with huge file sizes, so it may be slow to load. I considered compressing/resizing the images but I wanted the details to be preserved so I left them as-is. If the images don’t load, try viewing this post on a computer. Thanks!)
If you have a large media collection like me, you may have some content, like movies and videos, that are shot or rendered in HDR (High Dynamic Range).
If you also have a large collection of devices, you’ll know that most recent devices play back HDR content just fine. Just for a quick reference, here are some popular device lineups and when they started supporting HDR:
- Apple
- iPhone 8/8 Plus and up1
- iPad 9th-generation and up
- iPad Air 4th-generation and up
- iPad Mini 6th-generation and up
- All iPad Pro models (except the 1st-generation 12.9-inch)
- Macs with Apple Silicon
- Samsung
In addition, on devices that do not support HDR playback, some platforms and video players (such as VLC) allow you to “tone-map” HDR videos (we’ll get into what that is later) down to SDR, or Standard Dynamic Range. Which means you’ll still be able to enjoy your HDR content for now without upgrading your hardware.
Unfortunately, you start running into issues when you try and play back HDR content on devices that absolutely do not support HDR content in any way or form. Devices like old Android phones or tablets, or old Apple devices, etc. that do not allow you to load an external player that support HDR tone-mapping, will still allow you to play back the content, but you will notice something wrong about the video. The colors will all be washed out, and the brightness levels will be off. So what gives?
Color-clipping
To begin, let’s look at the “color space” that SDR videos use. SDR videos typically use the Rec. 709 color space, which looks a little something like this:

< From https://en.wikipedia.org/wiki/Rec._709 >
In contrast, HDR videos use the Rec. 2020 color space, which looks like this:

< From https://en.wikipedia.org/wiki/Rec._2020 >
Inside the cone shapes, you can see the black triangle that marks what part of the color spectrum the color space can represent. As clearly seen above, Rec. 2020 covers even more colors than Rec. 709.
This becomes a problem, because to properly display Rec. 2020 colors, your hardware (your device and your screen), platform, and video player must support displaying Rec. 2020 (obviously). For combinations of hardware-platform-software where proper tone-mapping is possible, you will see the correctly mapped color output where colors outside the Rec. 709’s color space has been “mapped” back in to the supported regions (that’s basically what tone-mapping is here).
But if your playback combo (hardware-platform-software) does not have proper tone-mapping support, the colors outside of the range of Rec. 709 are forcibly shifted in to the supported range (or “clipped”) during playback, and as a result, you get a grayish, washed-out image that looks terrible.
So how do you solve this problem?
Solutions
Here are some of the solutions, in the most preferable order:
- Upgrade your hardware to a HDR-supported device
- Use video players that support tone-mapping on-the-fly
- Obtain SDR versions of the content if it is available
- Re-encode your videos with
ffmpeg
In an ideal world, we’ll all have HDR-capable hardware, but this is not a utopia and there are devices that are being released right now that do not have proper support (or any support whatsoever) for HDR. And also, even if you only pick out HDR-compatible devices, it will be expensive, and it’s no reason to immediately replace your old devices when alternatives exist. (To be clear: if you were about to upgrade anyway and HDR was one of the reasons, buy away. But if you are upgrading simply because your device doesn’t support HDR, keep in mind that most devices right now, especially computers, do not support HDR, so it’s probably not worth it to upgrade just for HDR support alone.)
The next best solution would be to use a video player that supports tone-mapping, like VLC. This is applicable to desktop OSes where an alternative video player can be sideloaded at any time. But what if you’re using a device where sideloading in HDR support is hard or even impossible?
You could attempt to get an SDR copy of the content, if one is available. Going this route is probably easier and faster, since downloading will usually beat out encoding in terms of speed. But what if the HDR copy is the only copy?
That’s where re-encoding comes in!
Before we begin
I’d like to mention really quickly that most of the HDR to SDR conversion stuff that I write about in the next couple of sections is referenced from this now deleted blog post (it looks like the entire site is gone). You can check out the archived version on Wayback Machine here. Thanks to the original author, Daniel Stevens, for his blog post on the topic!
Original
For this demonstration, I’ll be using this video from YouTube to show the different conversion methods of HDR to SDR. (As the video is too big to attach here, I’ll stick with single frames from the middle of the video. You can follow along with the comparisons by using the same commands below!)
Let’s extract a single HDR frame and see how it looks in Rec. 709, without any tonemapping:
ffmpeg -ss 00:01:10.871 -i hdr-original.mp4 -vframes 1 original.png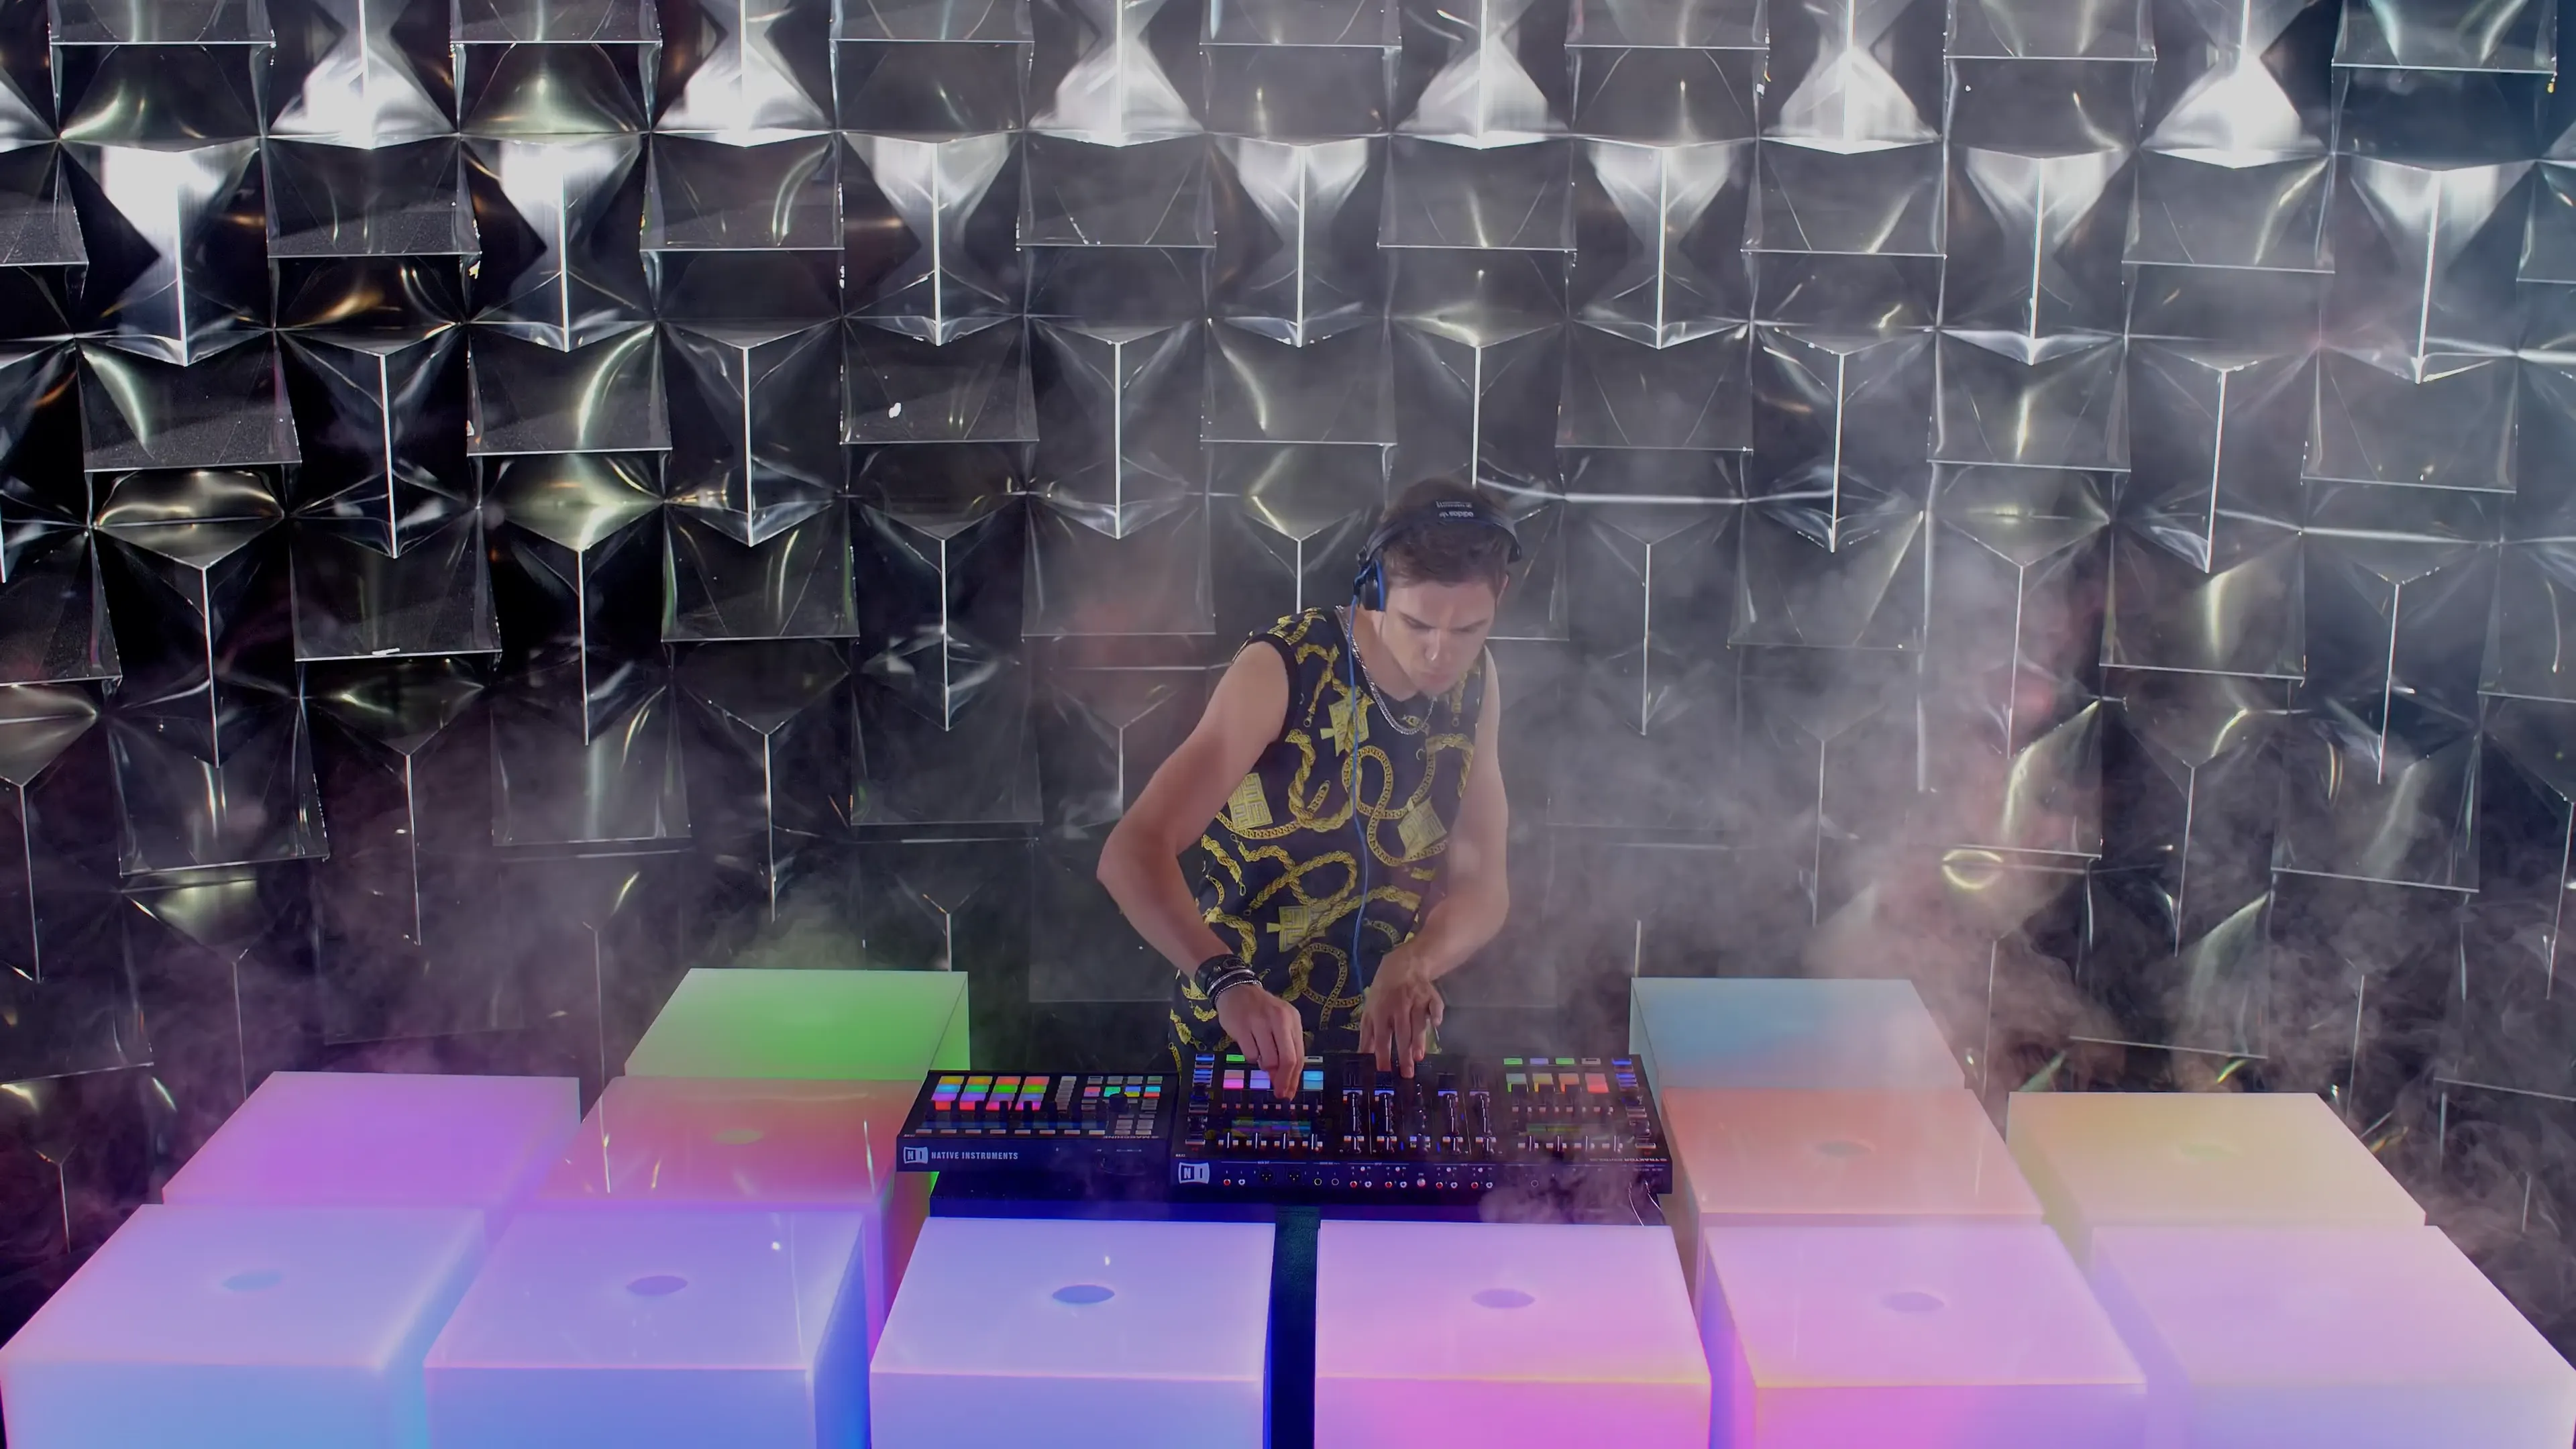
Looks rather washed out, which is what we expect. So what should we run to convert this to SDR properly?
Tonemap algorithms
There are several tonemap algorithms – mobius, hable, and reinhard. Let’s look at each one!
mobius
Extract the same frame and apply the mobius tonemap preset:
ffmpeg -ss 00:01:10.871 -i hdr-original.mp4 -vf 'zscale=t=linear:npl=100,format=gbrpf32le,zscale=p=bt709,tonemap=tonemap=mobius,zscale=t=bt709:m=bt709:r=tv,format=yuv420p' -vframes 1 mobius.pngAnd here’s what we end up with:
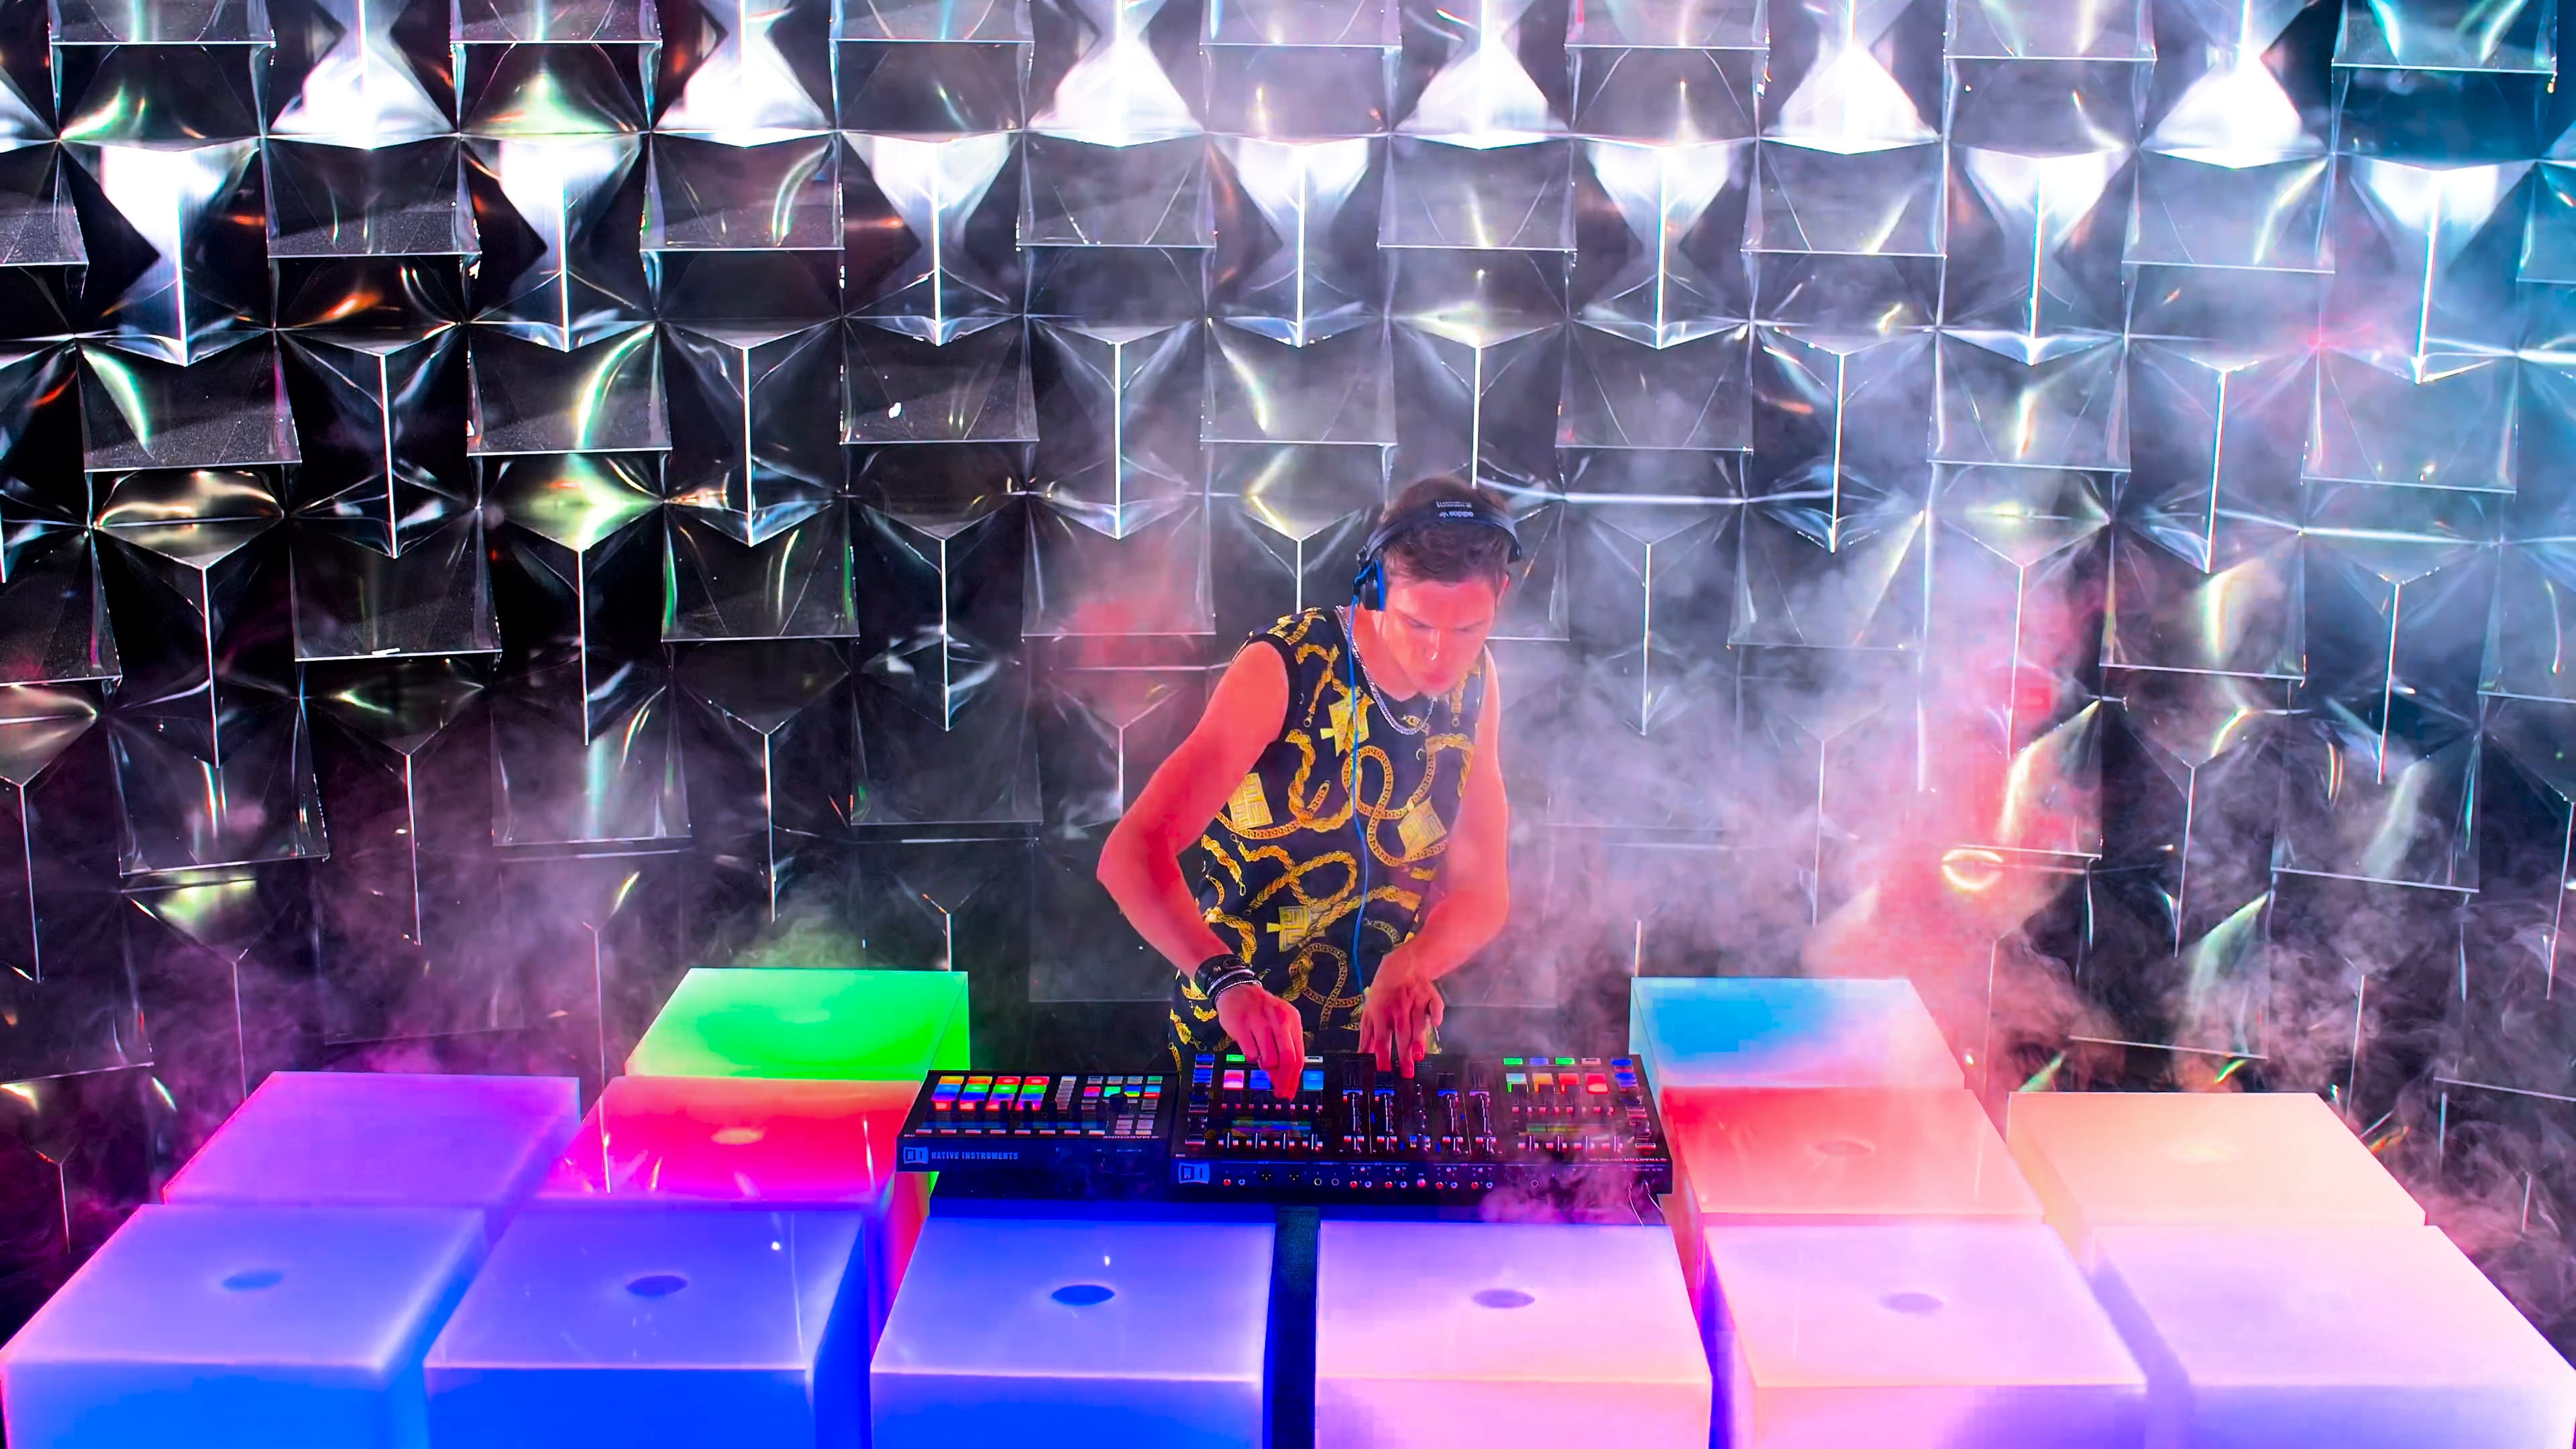
Okay, we see more colors! But something still feels off. The colors look too vibrant.
Let’s try the other two.
hable
The command:
ffmpeg -ss 00:01:10.871 -i hdr-original.mp4 -vf 'zscale=t=linear:npl=100,format=gbrpf32le,zscale=p=bt709,tonemap=tonemap=hable,zscale=t=bt709:m=bt709:r=tv,format=yuv420p' -vframes 1 hable.pngThe result:
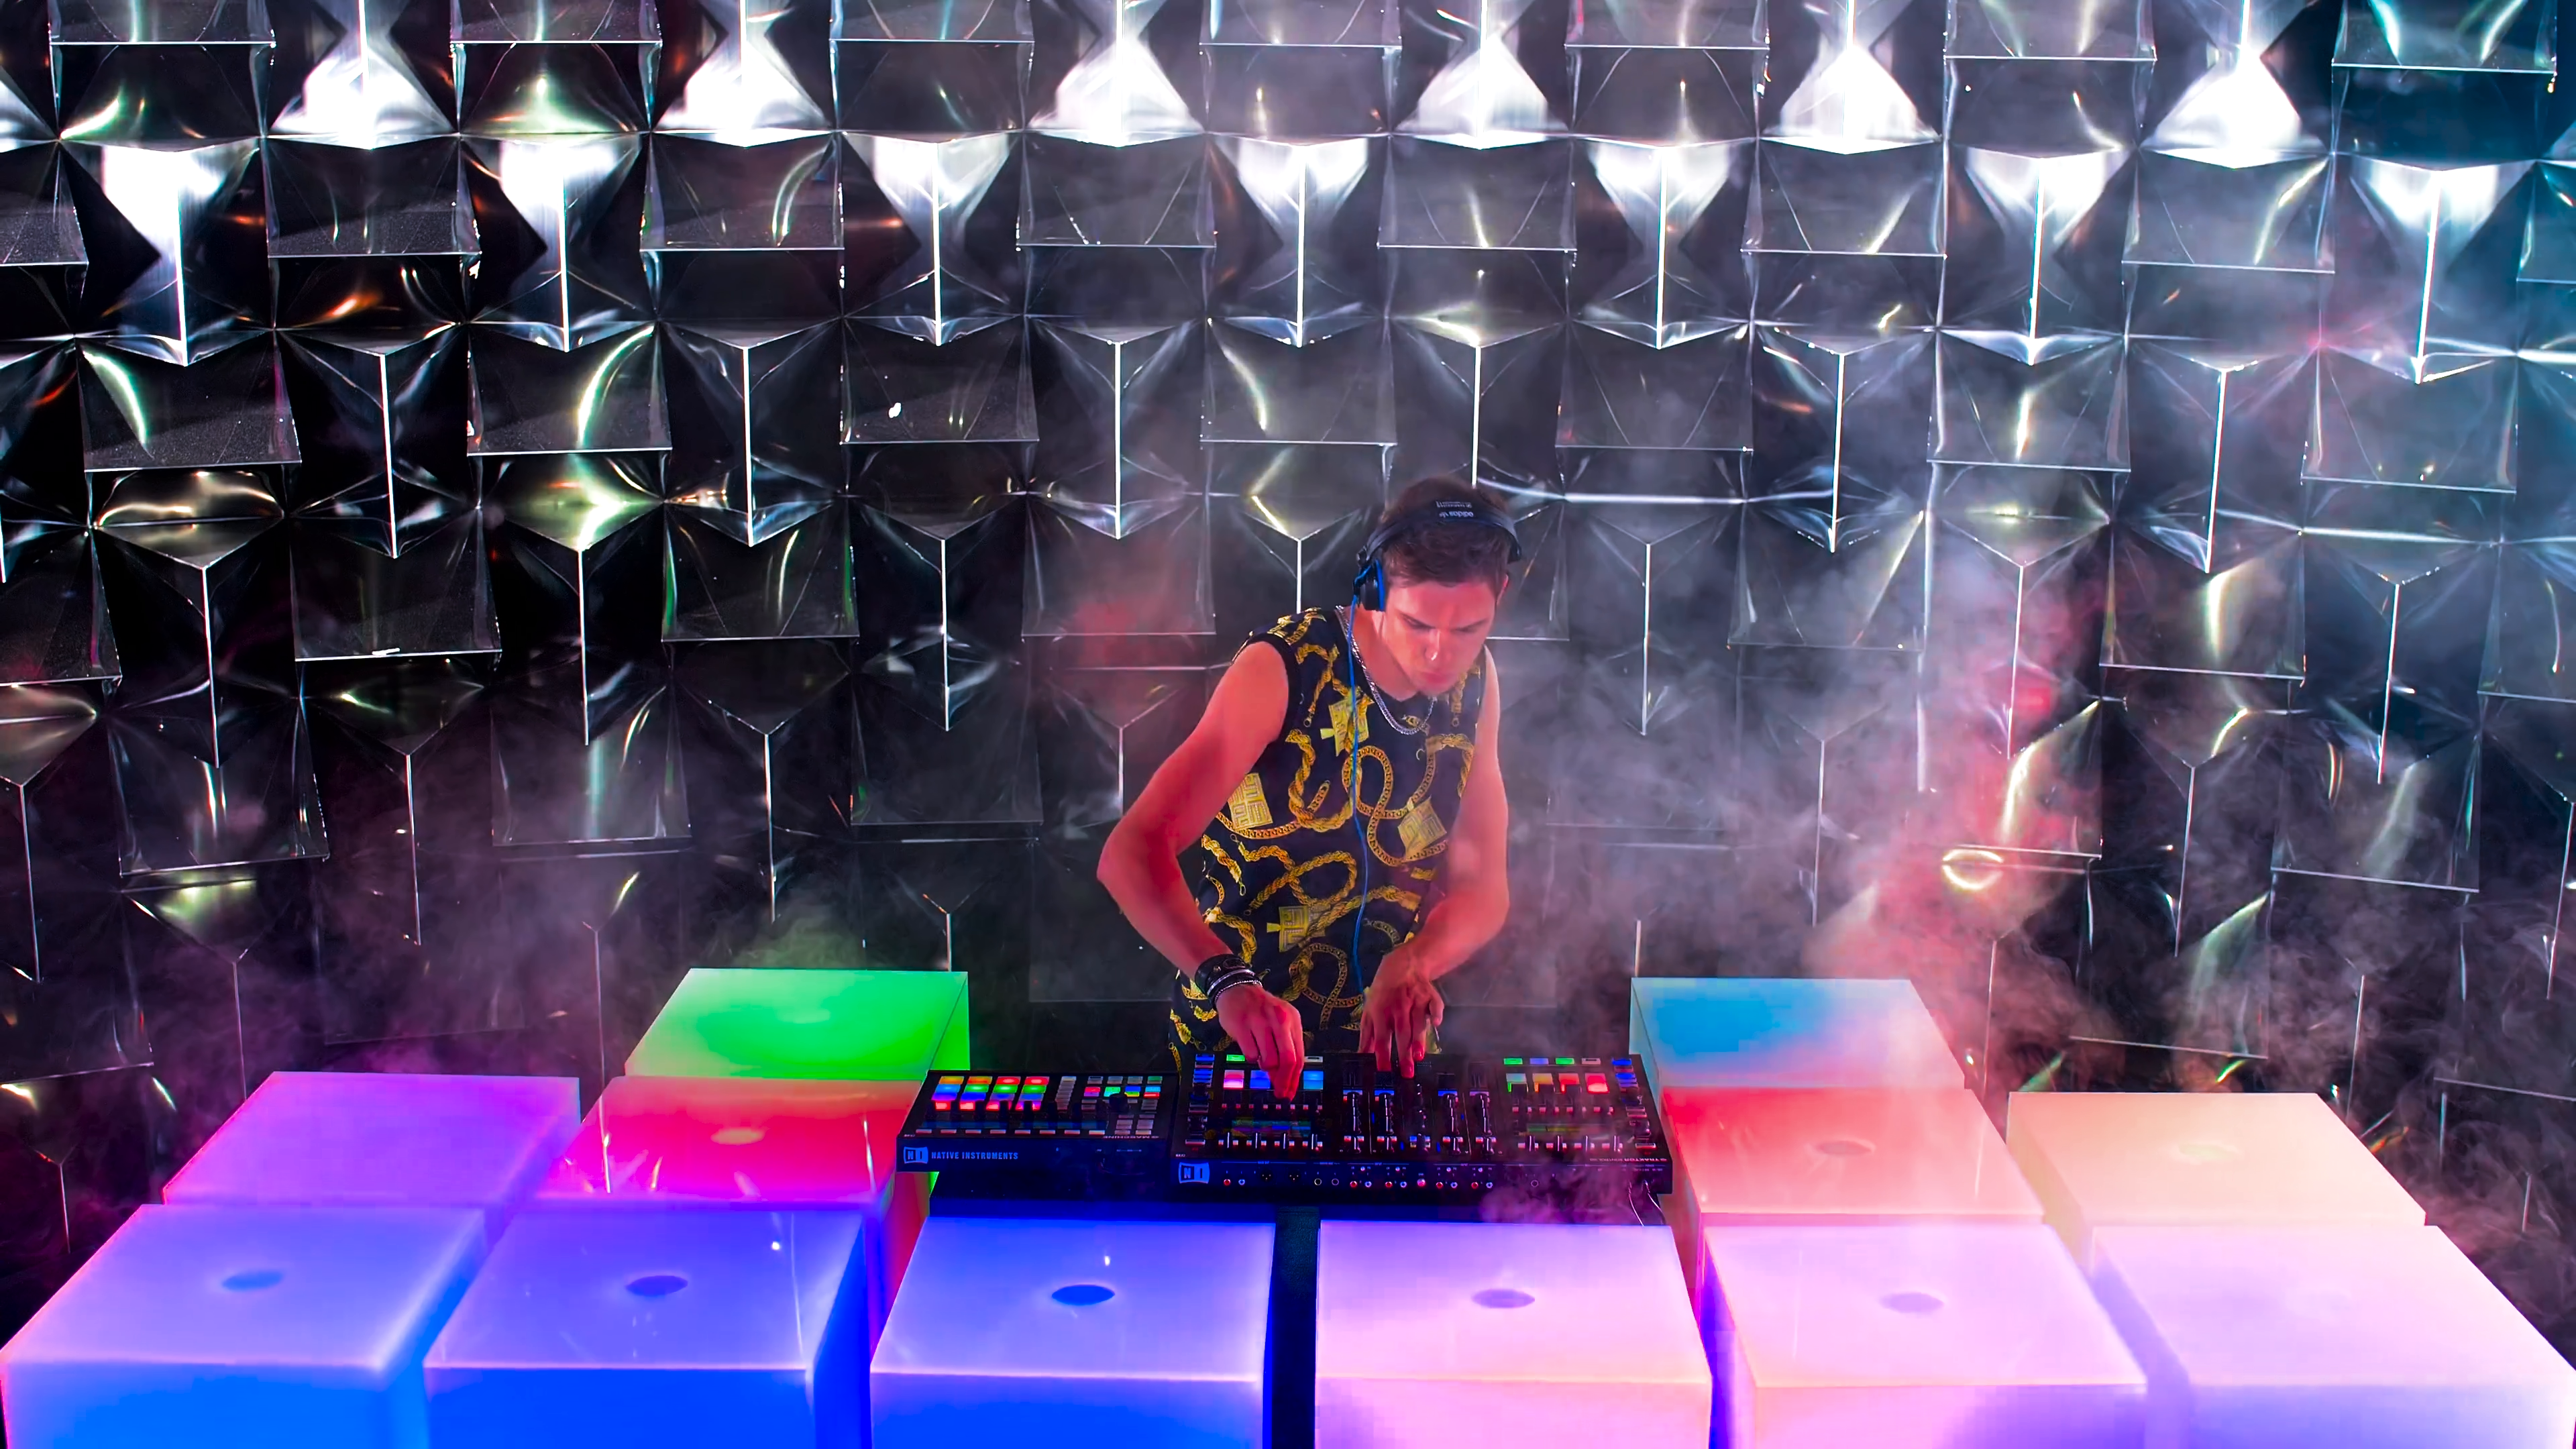
Okay, that looks… more like what we’re aiming for. What about…
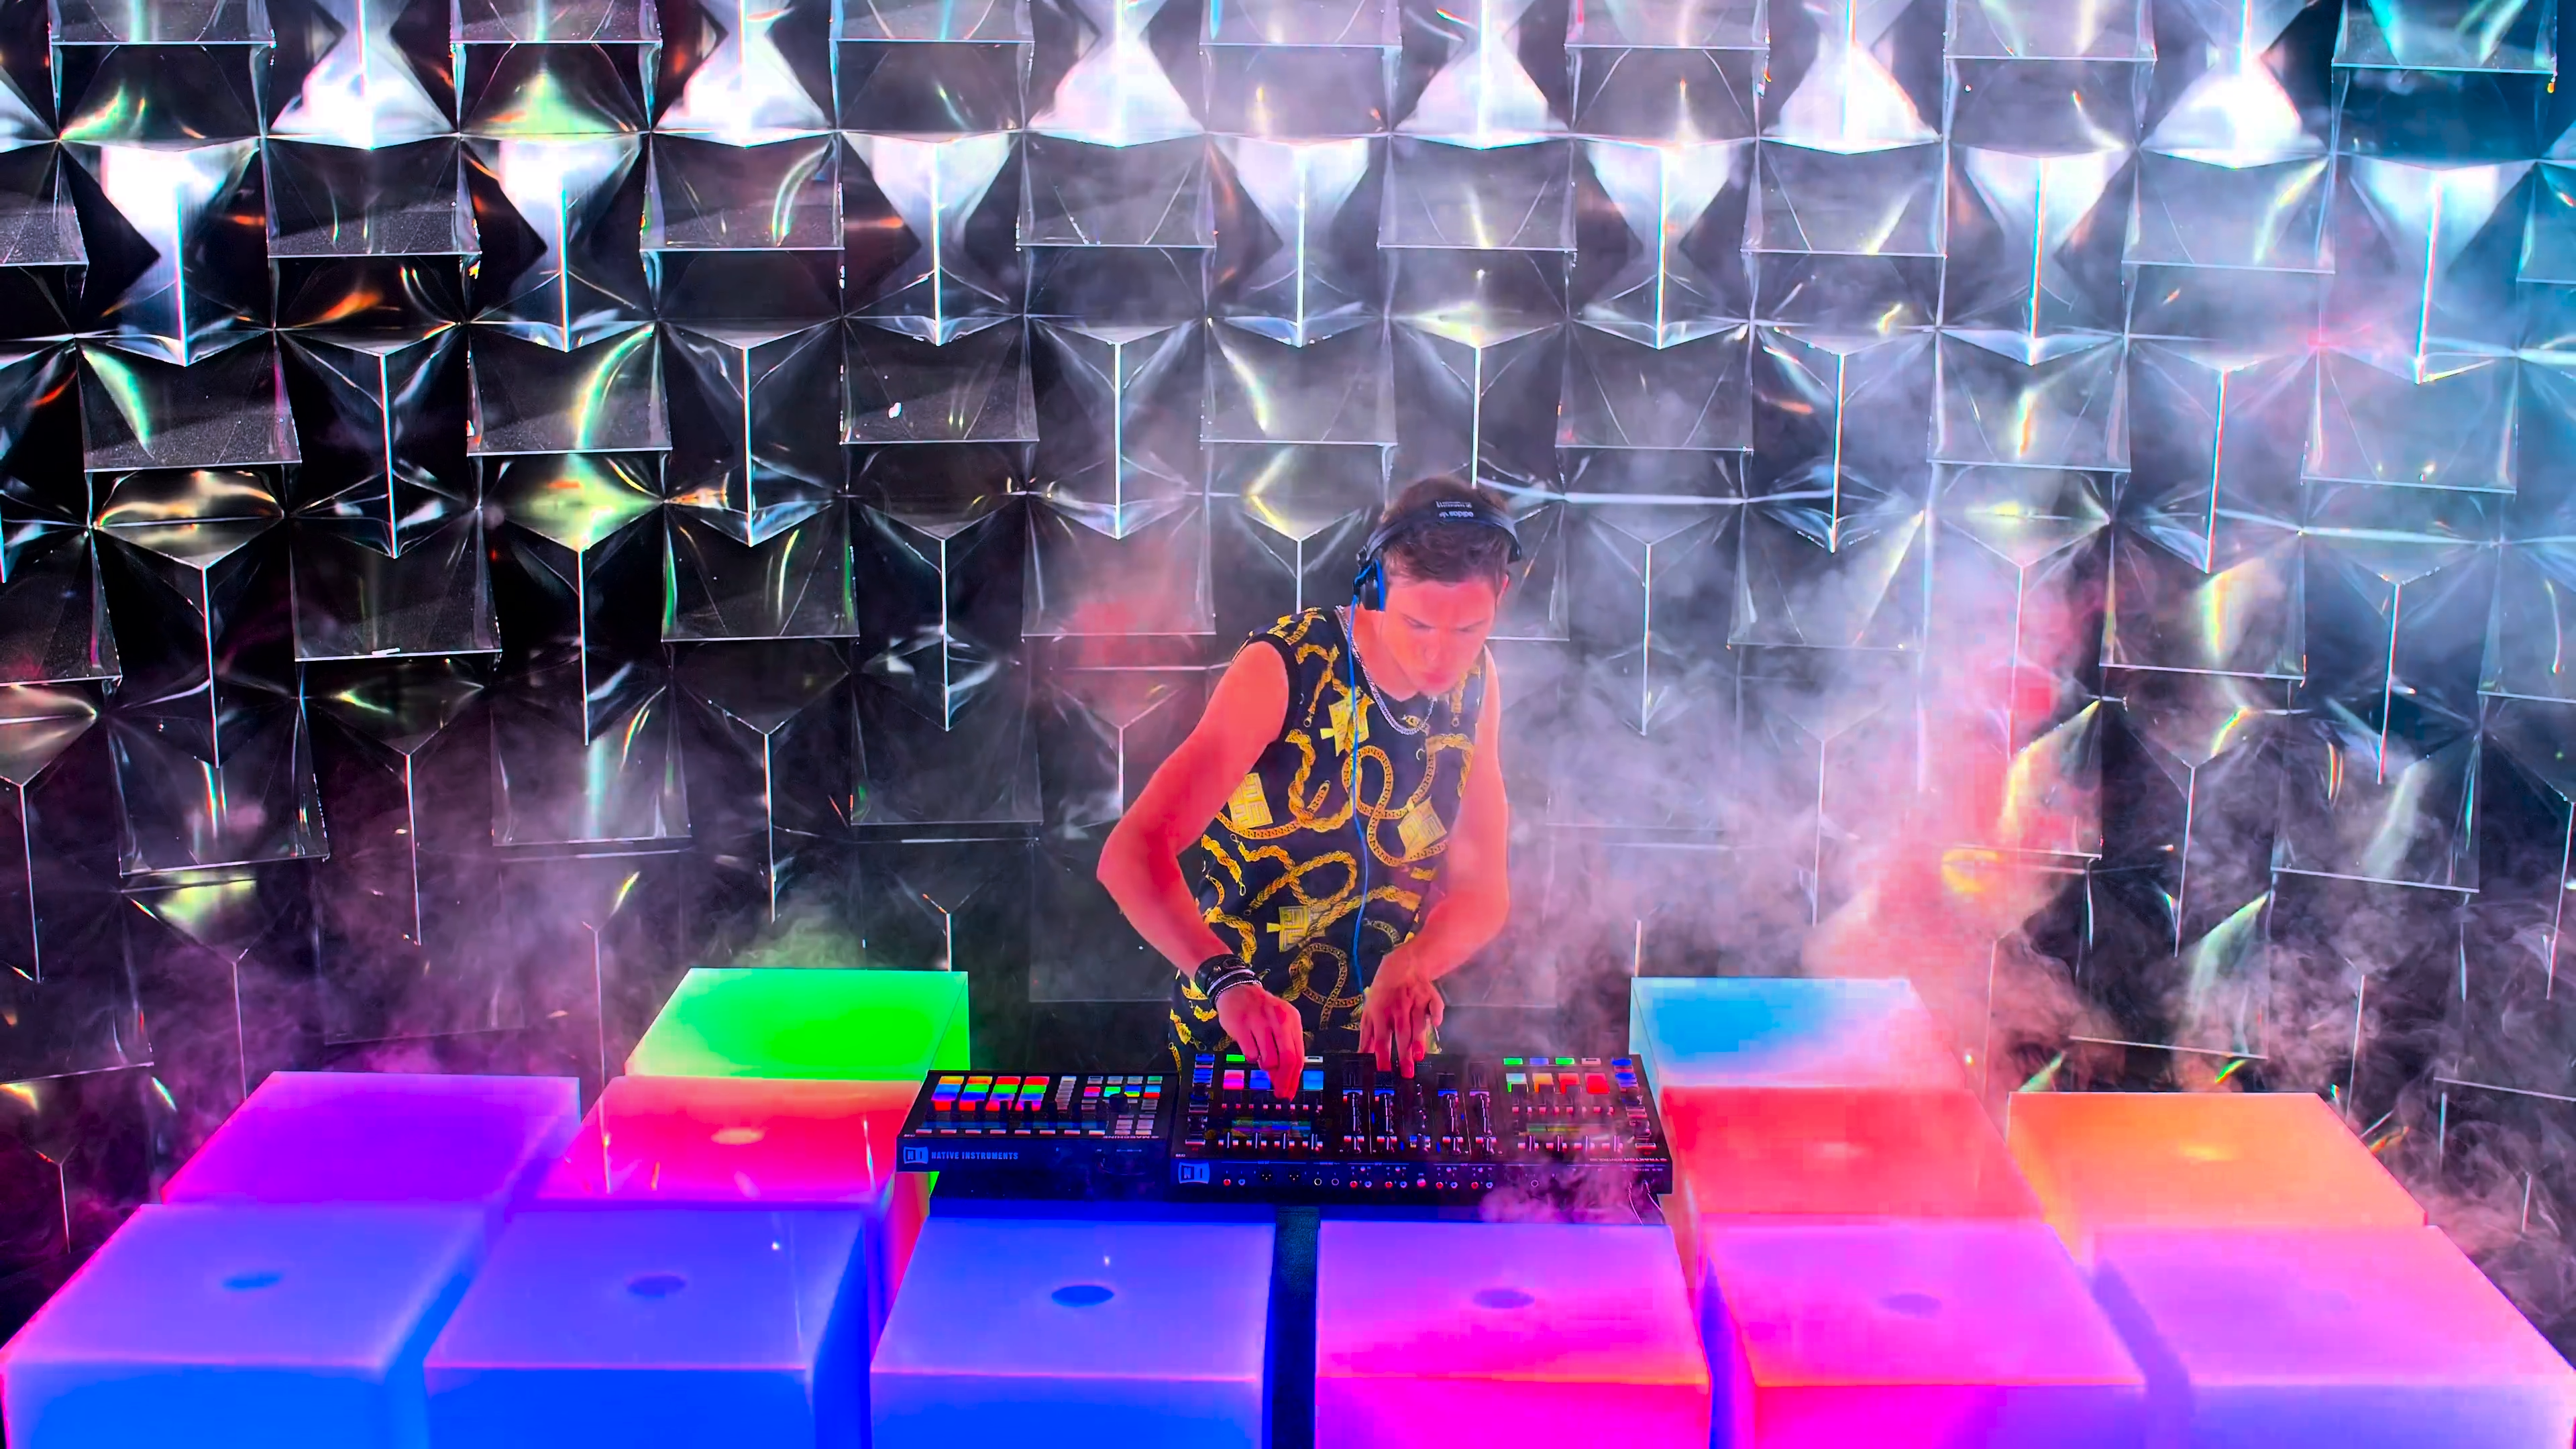
reinhard
The command:
ffmpeg -ss 00:01:10.871 -i hdr-original.mp4 -vf 'zscale=t=linear:npl=100,format=gbrpf32le,zscale=p=bt709,tonemap=tonemap=reinhard,zscale=t=bt709:m=bt709:r=tv,format=yuv420p' -vframes 1 reinhard.pngThe result:

It might be difficult to pick out the difference between this and hable, so I’ve made a little comparison thing below:
(hable on left, reinhard on right)
And in case you want to see how badly oversaturated mobius is:
(mobius on left, hable on right)
(mobius on left, reinhard on right)
Now that we’re done with the available presets, it’s time to go over one tweakable value within each preset. And that is…
Desaturation
From ffmpeg’s documentation:
Apply desaturation for highlights that exceed this level of brightness. The higher the parameter, the more color information will be preserved. This setting helps prevent unnaturally blown-out colors for super-highlights, by (smoothly) turning into white instead. This makes images feel more natural, at the cost of reducing information about out-of-range colors.
The default of 2.0 is somewhat conservative and will mostly just apply to skies or directly sunlit surfaces. A setting of 0.0 disables this option.
This tracks with the explanation from the blog article from Daniel Stevens. However, he recommends using the value of 0 to turn it off. But the documentation makes it sound like it’s a good setting to leave on to prevent “unnaturally blown-out colors for super-highlights.”
Let’s try generating a mobius image with desaturation set to 0 and compare it with the regular mobius (again, the defaults are 2.0. If I don’t specify a desaturation value, assume 2.0):
ffmpeg -ss 00:01:10.871 -i hdr-original.mp4 -vf 'zscale=t=linear:npl=100,format=gbrpf32le,zscale=p=bt709,tonemap=tonemap=mobius:desat=0,zscale=t=bt709:m=bt709:r=tv,format=yuv420p' -vframes 1 mobius-desat-0.pngSince it doesn’t make sense to just show the image on its own, I’ll make another comparison slider below:
(mobius on left, mobius with desaturation set to 0 on right)
And the rest:
ffmpeg -ss 00:01:10.871 -i hdr-original.mp4 -vf 'zscale=t=linear:npl=100,format=gbrpf32le,zscale=p=bt709,tonemap=tonemap=hable:desat=0,zscale=t=bt709:m=bt709:r=tv,format=yuv420p' -vframes 1 hable-desat-0.png
ffmpeg -ss 00:01:10.871 -i hdr-original.mp4 -vf 'zscale=t=linear:npl=100,format=gbrpf32le,zscale=p=bt709,tonemap=tonemap=reinhard:desat=0,zscale=t=bt709:m=bt709:r=tv,format=yuv420p' -vframes 1 reinhard-desat-0.png
(hable on left, hable with desaturation set to 0 on right)
(reinhard on left, reinhard with desaturation set to 0 on right)
Let’s try a different value. I’ll just generate a 0.5 for reinhard, though you can substitute whatever you want for different presets. And here’s the comparison:
(reinhard with desaturation set to 0.5 on left, reinhard on right)
I think this might be a matter of personal preference. If someone can tell me exactly why this should be disabled, I will update this section.
So, which one should you use to convert HDR videos into SDR?
(Personal) comparisons and thoughts
These are my personal thoughts based on the experiments I carried out above.
I immediately ruled out mobius because the algorithm distorts the colors and oversaturates them a lot. If you like that kind of punchy color, then it might be a good option, but I feel like it messes up the video’s color too much to be usable.
That leaves hable and reinhard. I found that reinhard produced brighter images, but hable looked more in-line with the original SDR source (when using content where HDR and SDR were both available so I could compare the output from ffmpeg). I think it’s a matter of personal preference, again, but I think I’ll go with reinhard, as I value being able to see things in a dark scene, which is harder to do with hable.
Usage examples
I wondered what algorithms were being used by various software that implemented HDR to SDR tonemapping and found the following:
- A lot of implementations and code examples on Stack Overflow preferred using
hablewith desaturation set to0. - On Jellyfin, the original issue thread about HDR to SDR tonemapping had a lot of commenters saying that they used
hablewith desaturation set to0. - On Jellyfin, the pull request that implemented tonemapping had
reinhardas the default value, with a recommendeddesatrange between0and0.5. - Inside the aforementioned pull request, one commenter asked why
hablewas not being used, and a Jellyfin developer (I assume) stated thathablewasn’t producing enough brightness asreinhard.
Converting actual video
So once you have your preferred algorithm, converting an entire video is as simple as removing the -ss and -vframes arguments and adding parameters for the used encoder, etc. like so:
ffmpeg -i input.mp4 -vf 'zscale=t=linear:npl=100,format=gbrpf32le,zscale=p=bt709,tonemap=tonemap=reinhard,zscale=t=bt709:m=bt709:r=tv,format=yuv420p' -c:v libx264 -preset veryfast -crf 18 -c:a aac -b:a 160k -movflags +faststart output.mp4Conclusion
While there is no one-size-fits-all solution for HDR-to-SDR tonemapping, the experiments above and the explanations should give you a pretty good understanding of how the process works and what you should test out to figure out your preferred algorithm.
Footnotes
-
While all iPhones above 8 and 8 Plus support HDR playback, that’s only on a software level. Some iPhones (including the aforementioned 8 and 8 Plus and probably some “budget” tier models like iPhone SE) do not support displaying actual HDR on a hardware level. ↩
-
Technically, Samsung supported “mobile HDR” playback starting from Galaxy S8/S8+ and Note 8. However, support for HDR10+ was only added starting with the devices listed above. ↩ ↩2