GPG - The Complete Crash Course
February 25, 2020
Warning: this page is older than 365 days. The content may be out-of-date.
Let’s jump right in with:
Creating a key
To create a key, run:
gpg --gen-keyIf that command does not guide you through the interactive process: selecting key size, key type, and what not – then run:
gpg --full-generate-keyYou should see the following:
gpg (GnuPG) 2.2.17; Copyright (C) 2019 Free Software Foundation, Inc.
This is free software: you are free to change and redistribute it.
There is NO WARRANTY, to the extent permitted by law.

gpg: directory '/Users/ericswpark/.gnupg' created
gpg: keybox '/Users/ericswpark/.gnupg/pubring.kbx' created
Please select what kind of key you want:
    (1) RSA and RSA (default)
    (2) DSA and Elgamal
    (3) DSA (sign only)
    (4) RSA (sign only)
Your selection?
Press Enter. RSA and RSA is fine.
RSA keys may be between 1024 and 4096 bits long.
What keysize do you want? (2048)
For keysize, I recommend 4096 bits. Type 4096 and press Enter.
Please specify how long the key should be valid.
        0 = key does not expire
    <n>  = key expires in n days
    <n>w = key expires in n weeks
    <n>m = key expires in n months
    <n>y = key expires in n years
Key is valid for? (0)
Now, the best practice is to set a expiration date for your key. But GnuPG also has another feature else in case you don’t want to repeat this key generation process every couple of years: creating subkeys, where you just create more and more keys with your “master” key. We’ll go more into subkeys below, but for now you can just leave it to never expire. Press Enter.
Key does not expire at all
Is this correct? (y/N)
GnuPG warns us that the key won’t expire. Type y, and then Enter.
GnuPG needs to construct a user ID to identify your key.

Real name:
This part should be easy. Just fill out your information, like so:
Real name: Eric Park
Email address: me@ericswpark.com
Comment: https://ericswpark.com/
You selected this USER-ID:
    "Eric Park (https://ericswpark.com/) <me@ericswpark.com>"

Change (N)ame, (C)omment, (E)mail or (O)kay/(Q)uit?
Press o, and then Enter. (If you want to change anything, just type the letter in parentheses for the field you want to change, and then press Enter!)
GPG should now prompt you for the passphrase. Type it in, then press Enter. You will need to do this twice. This will be the safeguard against anyone breaching your computer and taking the key. They won’t be able to use the key without the passphrase. (This does NOT mean, however, that you should not revoke your key. If you notice your key has been compromised, revoke the key immediately.)
Then GPG should start the process of generating your public/private key pair. This warning should come up:
We need to generate a lot of random bytes. It is a good idea to perform
some other action (type on the keyboard, move the mouse, utilize the
disks) during the prime generation; this gives the random number
generator a better chance to gain enough entropy.
If your computer is fairly modern and fast, this process should only take 30 seconds or so. Just shake your mouse pointer around until the terminal prompt changes to this:
gpg: /Users/ericswpark/.gnupg/trustdb.gpg: trustdb created
gpg: key 56F399E7A57D6E5D marked as ultimately trusted
gpg: directory '/Users/ericswpark/.gnupg/openpgp-revocs.d' created
gpg: revocation certificate stored as '/Users/ericswpark/.gnupg/openpgp-revocs.d/475C562EBC0520048AE79ADD56F399E7A57D6E5D.rev'
public and secret key created and signed.

pub   rsa4096 2019-12-20 [SC]
    475C562EBC0520048AE79ADD56F399E7A57D6E5D
uid                      Eric Park (https://ericswpark.com/) <me@ericswpark.com>
sub   rsa4096 2019-12-20 [E]
Congratulations! You created your first GPG key.
Listing available keys
To see your available keys, run:
gpg --list-keysThis should print something like:
gpg: checking the trustdb
gpg: marginals needed: 3  completes needed: 1  trust model: pgp
gpg: depth: 0  valid:   1  signed:   0  trust: 0-, 0q, 0n, 0m, 0f, 1u
/Users/ericswpark/.gnupg/pubring.kbx
------------------------------------
pub   rsa4096/56F399E7A57D6E5D 2019-12-20 [SC]
    475C562EBC0520048AE79ADD56F399E7A57D6E5D
uid                 [ultimate] Eric Park (https://ericswpark.com/) <me@ericswpark.com>
sub   rsa4096/2698CAAB8C3C9C8C 2019-12-20 [E]
Note that some distributions and operating systems may not show the key ID in full. To see the correct output, run this:
gpg --list-keys --keyid-format longYou can also use short, if you have a small number of keys and don’t want to type out the entire UUID!
Publishing your key
To give your key to others, you must first publish your key.
First, you need to find your public key ID. To do this, run the command from “Listing available keys.” In the output, find this line:
pub rsa4096/56F399E7A57D6E5D 2019-12-20 [SC]Anything after rsa4096/ should be different for you. That, 56F399E7A57D6E5D, is your public key ID.
Then send it off to the keyserver!
gpg --send-keys YOUR_PUBLIC_KEY_ID_HEREFollowing the syntax above, I would run:
gpg --send-keys 56F399E7A57D6E5DReceiving published keys
If you followed the steps above to publish your public keys, then it should be simple for others to retrieve your keys and start using them to encrypt data for your eyes or verify something is actually made by you.
Publish your key ID somewhere, maybe in a blog (hint, hint). Then others can just download your key using this command:
gpg --recv-keys PUBLIC_KEY_ID_HERESo for people to get my key ID (note that this is NOT my actual key, it’s just for this tutorial, look at my GPG page for the actual public key), they can just run:
gpg --recv-keys 56F399E7A57D6E5DIf GPG throws an error, it could be that the key is not available. Search for the key:
gpg --search-keys PUBLIC_KEY_ID_HERELike this:
gpg --search-keys 56F399E7A57D6E5DUsing custom keyservers
If you just run gpg --send-keys or gpg --recv-keys without any other parameters, GnuPG usually uses the default keyserver, which is at hkps://hkps.pool.sks-keyservers.net. You can see that this URL is a bit unique: rather than https, it now reads hkps. hkp and hkps is what GnuPG uses for the keyserver locations.
For example, when I had to verify my Manjaro .iso, I had to download the keyfiles of Philip Müller, the project leader, from a different keyserver. Their wiki gives the address of: hkp://pool.sks-keyservers.net
So to use a custom keyserver, just specify it as a parameter:
gpg --keyserver hkps://keyserver.url.here <parameters you want to run>So, to fetch Philip Müller’s key, I had to run:
gpg --keyserver hkp://pool.sks-keyservers.net --recv-keys 11C7F07ENote that the --keyserver parameter must be typed before the other parameters.
As of 2019, the default SKS keyserver that GPG uses seems to be dead. Read this article from First Look Media to learn more.
They recommend using the keys.openpgp.org keyserver to upload keys, which uses the Hagrid backend for serving keys. Apparently this is better since the SKS backend has a number of vulnerabilities being abused right now.
Creating a revocation certificate
This step is needed for when you accidentally expose your private key. Maybe you accidentally sent the wrong key file when sending your public key to your friend (this is why we use keyservers, like shown above)
Execute the following command:
gpg --gen-revoke PUBLIC_KEY_ID_HERE > PUBLIC_KEY_ID_HERE_revoke.ascSo for me, it would be:
gpg --gen-revoke 56F399E7A57D6E5D > 56F399E7A57D6E5D_revoke.ascThat command will produce something like the following output:
sec  rsa4096/56F399E7A57D6E5D 2019-12-20 Eric Park (https://ericswpark.com/) <me@ericswpark.com>

Create a revocation certificate for this key? (y/N)
Press y and then Enter to confirm.
Please select the reason for the revocation:
    0 = No reason specified
    1 = Key has been compromised
    2 = Key is superseded
    3 = Key is no longer used
    Q = Cancel
(Probably you want to select 1 here)
Your decision?
Press Enter to accept defaults, unless you have a specific reason behind the revocation.
Enter an optional description; end it with an empty line:
>
This part is optional. Continue by pressing Enter.
Reason for revocation: Key has been compromised
Is this okay? (y/N)
Press y and then Enter to confirm.
GPG will then ask you for your passcode to sign this revocation certificate with your private key. Type in your passcode, and then press Enter.
ASCII armored output forced.
Revocation certificate created.

Please move it to a medium which you can hide away; if Mallory gets
access to this certificate he can use it to make your key unusable.
It is smart to print this certificate and store it away, just in case
your media become unreadable.  But have some caution:  The print system of
your machine might store the data and make it available to others!
Fun fact: Mallory is an alias the GPG community gave for “bad actors”. The more you know! Also, if you are confused about the term “ASCII armored output”, check out this section explaining the differences between regular GPG files and ASCII-armored GPG files.
Finally, save the revocation certificate somewhere safe. This can be used to completely wipe out your key pair and render it useless, as the message warns above. Some paranoid people even print the ASCII-armored output and when it’s time to use them, they utilize OCR software to read the printout! But that’s probably overkill.
Revoking the key
Get the certificate you generated in the section above. Let’s locally revoke your key first:
gpg --import PUBLIC_KEY_ID_HERE_revoke.ascSo I would run:
gpg --import 56F399E7A57D6E5D_revoke.ascThen follow the steps in “Publishing your key” again to update the public key in the keyserver and let others know your key has been compromised. Note that once the changes have been published, you will not be able to stop the revocation locally.
Un-revoke the key
You can un-revoke your key only if you haven’t pushed the revoked public key to a keyserver.
Let’s make GPG forget that you requested the revocation:
gpg --expert --delete-key PUBLIC_KEY_ID_HEREFor me it would be:
gpg --expert --delete-key 56F399E7A57D6E5DThe --expert parameter allows you to delete the public key only.
gpg (GnuPG) 2.2.17; Copyright (C) 2019 Free Software Foundation, Inc.
This is free software: you are free to change and redistribute it.
There is NO WARRANTY, to the extent permitted by law.


pub  rsa4096/56F399E7A57D6E5D 2019-12-20 Eric Park (https://ericswpark.com/) <me@ericswpark.com>

Delete this key from the keyring? (y/N)
Type y, and then Enter to confirm.
Now we need to download the clean public key from the keyserver, that hasn’t been marked as revoked. Follow the steps from “Receiving published keys” for this process.
Alternatively, you could also import a local copy of the public key, if you had a backup available with the key not being marked as revoked.
Importing keys
Importing keys is also crucial. You will use it all the time to get keys from other sources (in case you don’t trust keyservers).
Fortunately, this process is fairly simple. You just need a GPG file, or an ASCII-armored GPG file. They usually have the following extensions: .gpg, .asc, or .key.
Run the following command:
gpg --import KEY_FILE_NAME.ascWhat is ASCII-armored?
ASCII-armored basically means it’s in text form and not in a binary format. This makes it useful, for example, when you’re sending the file over email.
Usually, you can force ASCII-armored by appending the parameter --armor to your command - this will ensure your file is editable via text editor (not that you would ever want to edit something outputted by GPG).
Signing keys
This is also part of the key management process. Don’t worry, we’re getting to the fun part of encrypting, decrypting, and certifying data, but this part may actually be more fun to you.
I first have to explain the “web of trust.” Quite honestly, I like this model better than the “Certificate Authority” model that SSL uses.
Do you know how you get the padlock on your browser, next to that URL? That green padlock is letting you know that the site you’re visiting is actually the site you want, and that the contents are encrypted in transit.
To do this, the site owner must get an SSL certificate from a root authority, such as Let’s Encrypt, Comodo, DigiCert, and so on. Out of these providers, Let’s Encrypt is the only one that does this for free, but the reason they can provide it for free is that they are a) sponsored by a lot of charitable organizations, and b) because the signing window is small (i.e. you can only have it signed for like 3 months or so.) Also, Let’s Encrypt relies on an automated way of verifying websites, saving costs.
So why are the rest of those providers asking for money for SSL certificates? Well, every time they give out the SSL certificates, the providers need to make sure that they’re giving the certificates to the actual owner of the website. Bad stuff can happen if they accidentally hand out SSL certificates for the wrong owners/servers, something that has definitely happened in the past. When this happens frequently, browser developers typically de-list the specific root authority that is causing problems, so the providers have a lot of incentive to verify owners properly.
Of course, there’s that entire issue of governments spying on their citizens by installing rogue root authorities, but that’s not in the scope of this article. What I’m trying to point out here is that this model is horrible. It’s horrible because you’re relying on that one central authority to be the “good guys” and not create certificates for people that don’t deserve them.
To counter this, a different model that GPG uses is the “web of trust”. You’ll see why it’s called a web in a moment. Let’s say I have a friend, A. I know who A is as I’ve met him in person, so I sign A’s key. Later, A meets B, a close friend of A but a complete stranger to me. B asks A if A can sign his key. Because A trusts B, A does the same, and signs B’s key. Now, A suggests to me that I should host a party with B. Since I don’t know B, I need to share contact information with B. I go to B’s website and find B’s public key. Now I know I can trust B, because B is trusted by A, and I trust A.
This model works wonders because the more keys you sign, the more keys they sign, the higher this level of confidence that the keys belong to the right person. This is why it’s called a web of trust. When put together, the entire system looks like a web:
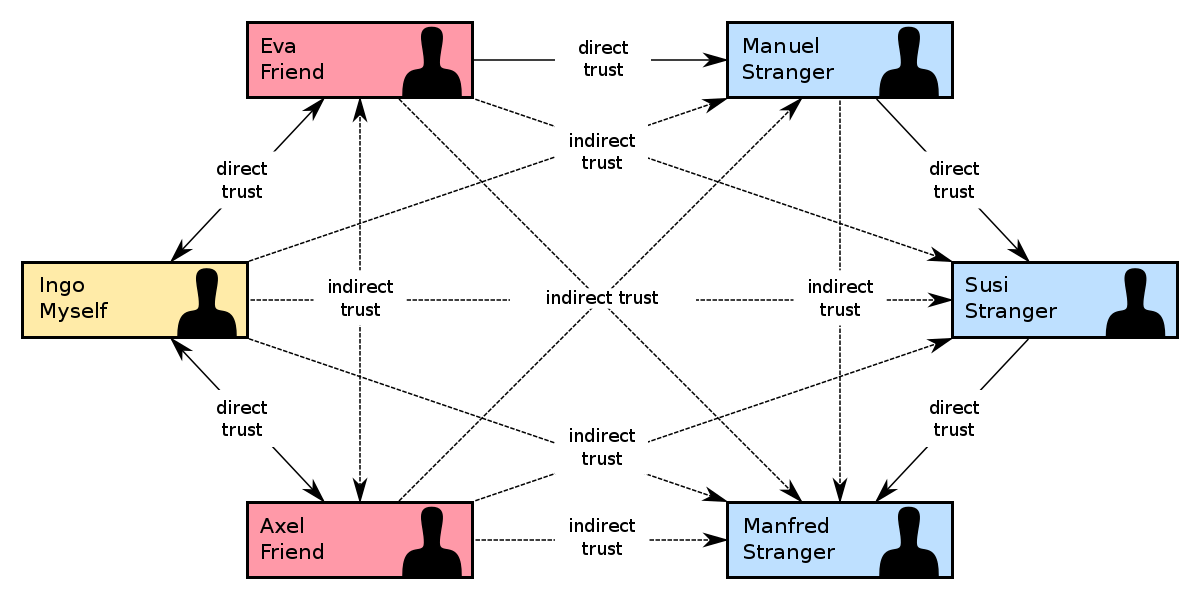
< From https://en.wikipedia.org/wiki/Web_of_trust >
People even host real-life parties to sign keys! Of course, that doesn’t mean you should just sign any random stranger’s key… You should always verify their identity!

< From https://xkcd.com/364/ >
The process is simple - you note down your public key ID on paper (you usually do not bring your computer containing your key pair since that can increase the chances of your private key being leaked) and attend a key signing party. During the event, you write down as many public key IDs as you can, provided that you have verified each individual’s identity first. Afterwards, you come home, you receive the keys, and then you sign them:
gpg --sign-key PUBLIC_KEY_ID_OF_STRANGERAnd then you publish them again to reflect that you trust the key. (Note that you should publish their public key, NOT your public key.) Warning: if their key was not published in the first place, publishing them may be rude, so you should always ask for the key-owner’s permission.
For example, if I wanted to sign that Manjaro developer’s key, I would type:
gpg --sign-key 11C7F07EThis would result in the following output:
pub  rsa2048/CAA6A59611C7F07E
    created: 2012-05-05  expires: never       usage: SC
    trust: unknown       validity: unknown
sub  rsa2048/320011450576724A
    created: 2012-05-05  expires: never       usage: E
[ unknown] (1). Philip Müller (Called Little) <philm@manjaro.org>


pub  rsa2048/CAA6A59611C7F07E
    created: 2012-05-05  expires: never       usage: SC
    trust: unknown       validity: unknown
Primary key fingerprint: E4CD FE50 A2DA 85D5 8C8A  8C70 CAA6 A596 11C7 F07E

    Philip Müller (Called Little) <philm@manjaro.org>

Are you sure that you want to sign this key with your
key "Eric Park (https://ericswpark.com/) <me@ericswpark.com>" (56F399E7A57D6E5D)

Really sign? (y/N)
Type y, and then Enter. GPG will ask you for your password. Type it, then press Enter to sign the key.
Remember that you may also need to update their “trust level”. (Down below)
Key signing party guide
- Do not bring your computer. This increases the chances of your computer getting infected with key-stealing malware, or you accidentally misplacing your private key. Just publish your public key, jot down your public key ID somewhere, and then bring that to the event.
- For friends, just sign their keys. For strangers (like if you are at an international event or something), verify their identity with something like their passport, and make sure their identification papers are not forged.
- You can always batch-sign keys after the key signing event. Weird, right? Yeah, the actual key signing happens after the event.
What is trust?
Trust, in GnuPG, is this mental note you put down in your own keyring, noting down how “trustworthy” an individual is.
Let’s say I have this great nerd friend that will only sign responsibly by verifying all identities before signing. I’ll give this friend a higher trust value because I believe that this friend will make good decisions.
Compare that to a key signing event, where I’m signing the keys of complete strangers. I don’t even know if they’re responsible or not - I’ve only just met them! Therefore, when I sign their key, I assign them a trust value of unknown, or 1.
Note that if you sign someone’s key, their default trust value will be 1 - or unknown. This is usually what you want, unless you really trust the individual to make good decisions.
To edit someone’s trust value, use this command:
gpg --edit-key SOMEONES_PUBLIC_KEY_IDThen type trust, and Enter to edit their trust value. Press Enter to save the trust value, and then type quit to exit the application.
Backing up your keys
If you lose your key pair, horrible things can happen. And these events are all too common. Dead hard drive, lost USB, computer blows up, et cetera. Let’s prevent a catastrophe!
If you want to be lazy, just back up the entire .gnupg directory. There you go, keep that safe. But if you want a more thorough approach, run:
gpg --export-secret-keys --armor KEY_ID > KEY_ID_secret.ascThis should save your secret key to the file KEY_ID_secret.asc. Back it up somewhere safe.
For added convenience, also back up your public key. This is not strictly required, but deriving the public key from the private key is annoying:
gpg --export --armor KEY_ID > KEY_ID_public.ascNote that if you ever re-import your keys, you may have to set their trust level to 5 again to let GPG know that the keys are yours.
Subkeys!
Subkeys are basically smaller keys made from your master key file. You can play a bit loose with them, because even if they get exposed you can easily revoke them with your master key.
Run the following command to edit your master key:
gpg --edit-key YOUR_KEY_IDThis will result in the following output:
gpg (GnuPG) 2.2.17; Copyright (C) 2019 Free Software Foundation, Inc.
This is free software: you are free to change and redistribute it.
There is NO WARRANTY, to the extent permitted by law.

Secret key is available.

sec  rsa4096/56F399E7A57D6E5D
    created: 2019-12-20  expires: never       usage: SC
    trust: ultimate      validity: ultimate
ssb  rsa4096/2698CAAB8C3C9C8C
    created: 2019-12-20  expires: never       usage: E
[ultimate] (1). Eric Park (https://ericswpark.com/) <me@ericswpark.com>

gpg>
Let’s add a key using addkey:
Please select what kind of key you want:
    (3) DSA (sign only)
    (4) RSA (sign only)
    (5) Elgamal (encrypt only)
    (6) RSA (encrypt only)
Your selection?
You probably need two subkeys: one for signing, and one for encrypting. There’s already a subkey for encrypting, so for now, I’ll show how to create a signing subkey. Type 4 and then press Enter:
RSA keys may be between 1024 and 4096 bits long.
What keysize do you want? (2048)
Again, we will use 4096 here.
Requested keysize is 4096 bits
Please specify how long the key should be valid.
        0 = key does not expire
    <n>  = key expires in n days
    <n>w = key expires in n weeks
    <n>m = key expires in n months
    <n>y = key expires in n years
Key is valid for? (0)
Enter again, key does not expire (again, you can just revoke them if you lose them). If you need a temporary key that needs to expire, use the syntax above to set a time limit for them. For example, if you want them to expire after 3 months, then type 3m. But for now, I’ll accept the defaults:
Key does not expire at all
Is this correct? (y/N)
Press y, and then Enter.
Really create? (y/N)y again, and then Enter. It should ask you for your passphrase, and then warn you about entropy, and then create that beautiful subkey:
sec  rsa4096/56F399E7A57D6E5D
    created: 2019-12-20  expires: never       usage: SC
    trust: ultimate      validity: ultimate
ssb  rsa4096/2698CAAB8C3C9C8C
    created: 2019-12-20  expires: never       usage: E
ssb  rsa4096/CFE50DE6144F5CA0
    created: 2019-12-20  expires: never       usage: S
[ultimate] (1). Eric Park (https://ericswpark.com/) <me@ericswpark.com>

gpg>
You can see the subkey right there, with the ID CFE50DE6144F5CA0! Now we need to save the changes. Type save, and then Enter.
To export the key and use it somewhere else, type:
gpg --export-secret-subkeys --armor CFE50DE6144F5CA0! > CFE50DE6144F5CA0_subkey.ascThe exclamation mark is extremely important. Without it, you will be exporting ALL of the subkeys, which might not be what you want (for example, you wouldn’t want to export your decryption subkey to a sensitive computer!)
Then on the target computer, type:
gpg --import CFE50DE6144F5CA0_subkey.ascTo import the subkey! If you want to revoke it at any time, just edit your master key again, and then type revkey. Finally, publish your changes to the keyserver.
To delete your main keyring, run:
gpg --delete-secret-key KEY_IDNote that this also removes your keyring (be careful!)
Keeping keys updated
Keys constantly change. People may sign keys, revoke them, or even generate new ones! So to keep your keyring up-to-date, it’s a good idea to run this periodically:
gpg --refresh-keysThis also updates your public key, if you’ve published them on a keyserver.
Now pat yourself on the back if you’ve come this far, as we will now get into how to actually utilize those keys!
Encrypting files
You need the other person’s public key for this. Type the following command:
gpg --encrypt file.tar.gzGPG will prompt you to enter the user ID. Enter their name if their name is unique in your keyring, or their public key ID.
You can also specify it with the parameters:
gpg --encrypt file.tar.gz -r "Eric Park"Remember, you can ASCII-armor your GPG file here!
Decrypting files
This one is easy, since your private key file is already there. Run the following command:
gpg --decrypt file.tar.gz.gpgOr .asc, if the file is ASCII-armored.
Signing files
Depending on how you want to sign a file, there are a couple of options. If you want to make a compressed, signed file, run the following command:
gpg --sign file.tar.gzThis command will create either file.tar.gz.gpg or file.tar.gz.asc, depending on whether or not you supplied the --armor flag.
When you send your recipient the file, you just need to send them the file.tar.gz.asc file. They can verify it using the command below, and decrypt (unpack) it using the command above, without the need for your private key. (This is because the file is merely compressed and signed - it’s not encrypted with your public key.)
However, this method has problems. What if you are sending an email, and want your recipient to be able to read it immediately, without decrypting the file?
Well, you can send your recipient a cleartext file signed with your key:
gpg --clearsign file.txtThis is used when you’re sending plaintext documents, like emails. The plaintext message is first shown, and the signature follows shortly after.
That’s great and all, but what about big files? You don’t want to necessarily create another file for the signature that will take up just as much as the original file! This is where “detached” signature files come in. Most Linux distributions and other big library/framework projects use this method for distribution. You create a detached signature using this command:
gpg --detach-sig file.iso“Wait,” you say. “What’s the difference between this and the first command?”
The first command compresses the entire file, signs it, and then spits out a GPG file based off of that. This means that transport becomes easier, because the signature and the file becomes one file. However, the method requires you to pack the file and spend resources making a new file, and the method requires the recipient to use as much resources to unpack the signature file to get the original file.
However, this “detach” command creates a signature file that is only a couple of kilobytes in size. This in turn is used to verify the original file. This is what you see when you see files on Linux distribution websites - “Ubuntu.iso” and “Ubuntu.iso.sig” or “Ubuntu.iso.asc”. The latter two verifies the first file, and they are only a couple of kilobytes in size.
In comparison, if you used the first command to generate the signature, GPG will actually warn you that the signature is NOT a detached signature, and therefore GPG has no way of verifying the original file. You will have to unpack the signed file and then compare checksums between the two file to make sure they are not tampered with. But at that point you don’t need to download the original file. This is why the first command should be reserved for files of small size.
TL;DR - Clearsign for emails and plaintext files, detach for big files (like .isos), and finally compress and sign for regular files (couple of megabytes).
Verifying files
gpg --verify file.tar.gz.gpgConclusion
Thanks for following along on this long article! I hope you learned a thing or two about GPG and keys and signing and encryption.