Bypassing NAT with reverse SSH tunneling
August 20, 2018
Warning: this page is older than 365 days. The content may be out-of-date.
Problem
I had recently moved to China, where I discovered that the carriers used CGNAT to combat the growing problem of shrinking IPv4 assignments. No surprises there, since China is literally booming with people. However, this posed a big problem for my home server and network, since in Korea I had my very own public IP address handed out to me.
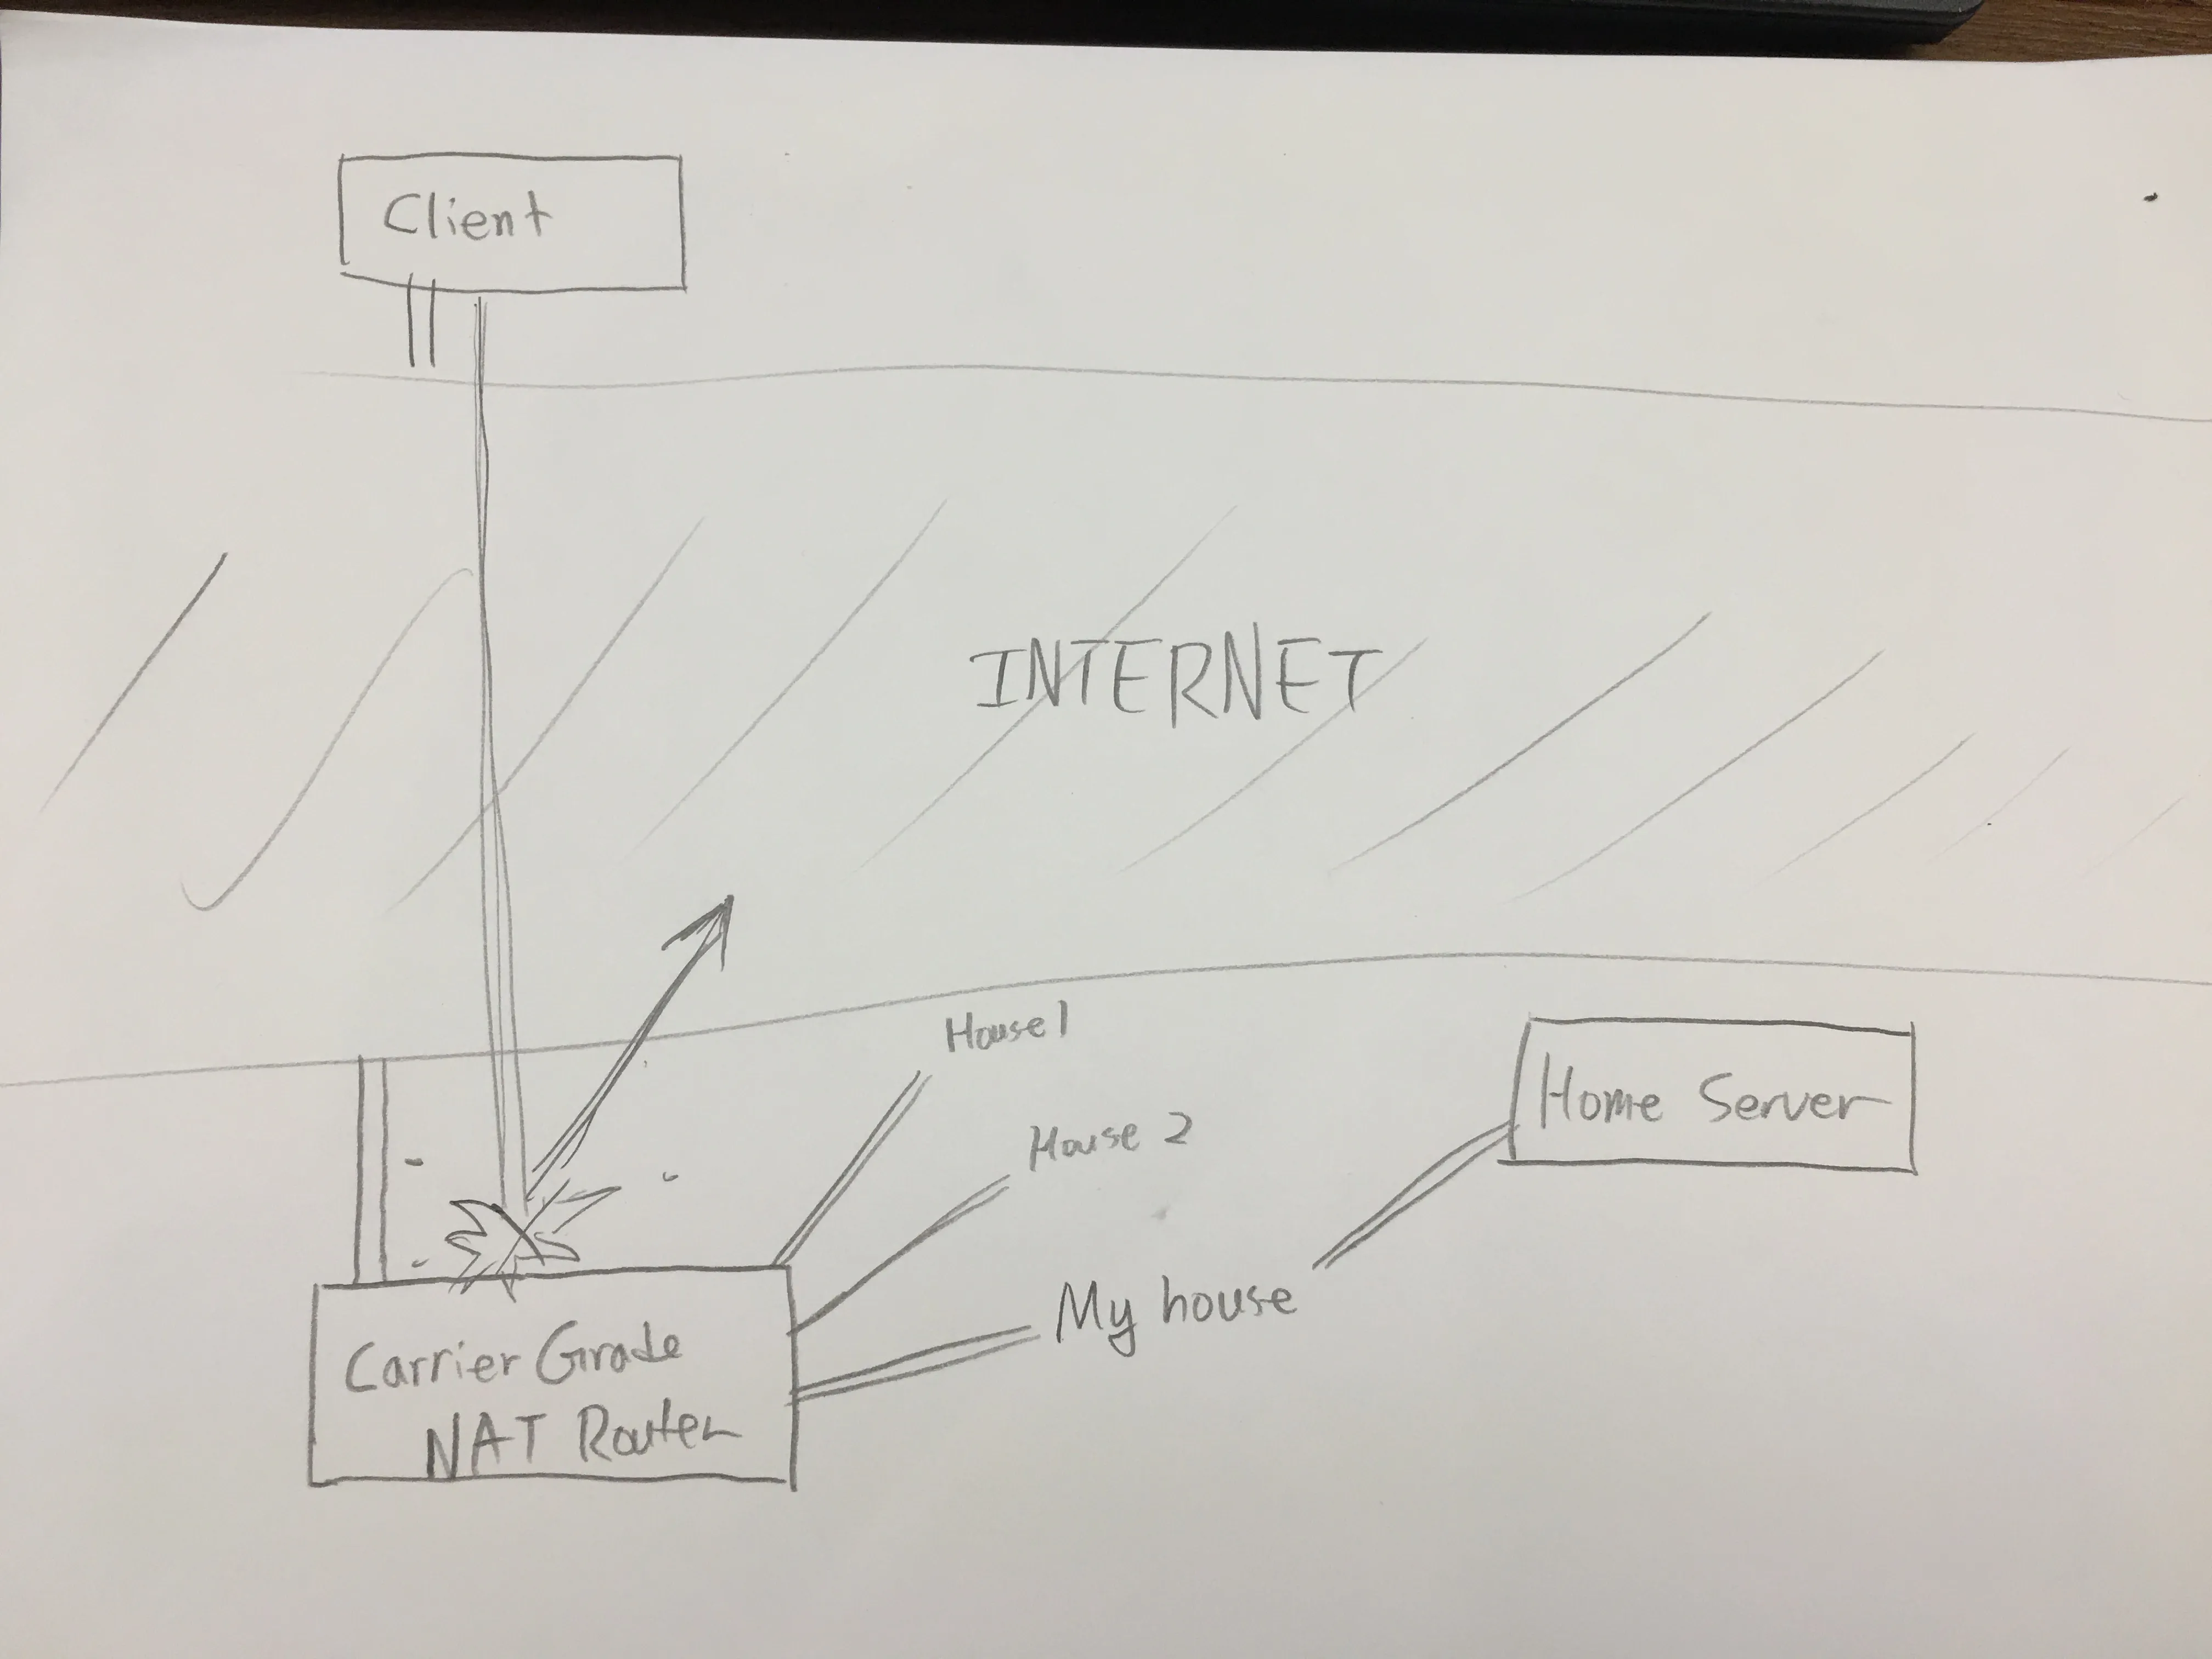
But there is always a solution - and this time, the solution came in the form of SSH. Using SSH, I could forward literally any ports I wanted, from my local network, to a remote server that did have a public facing IP address.
In this tutorial, I’ll go over how to get your own remote server set up, and tunnel your very own home server to a remote server so that you could access it from anywhere.
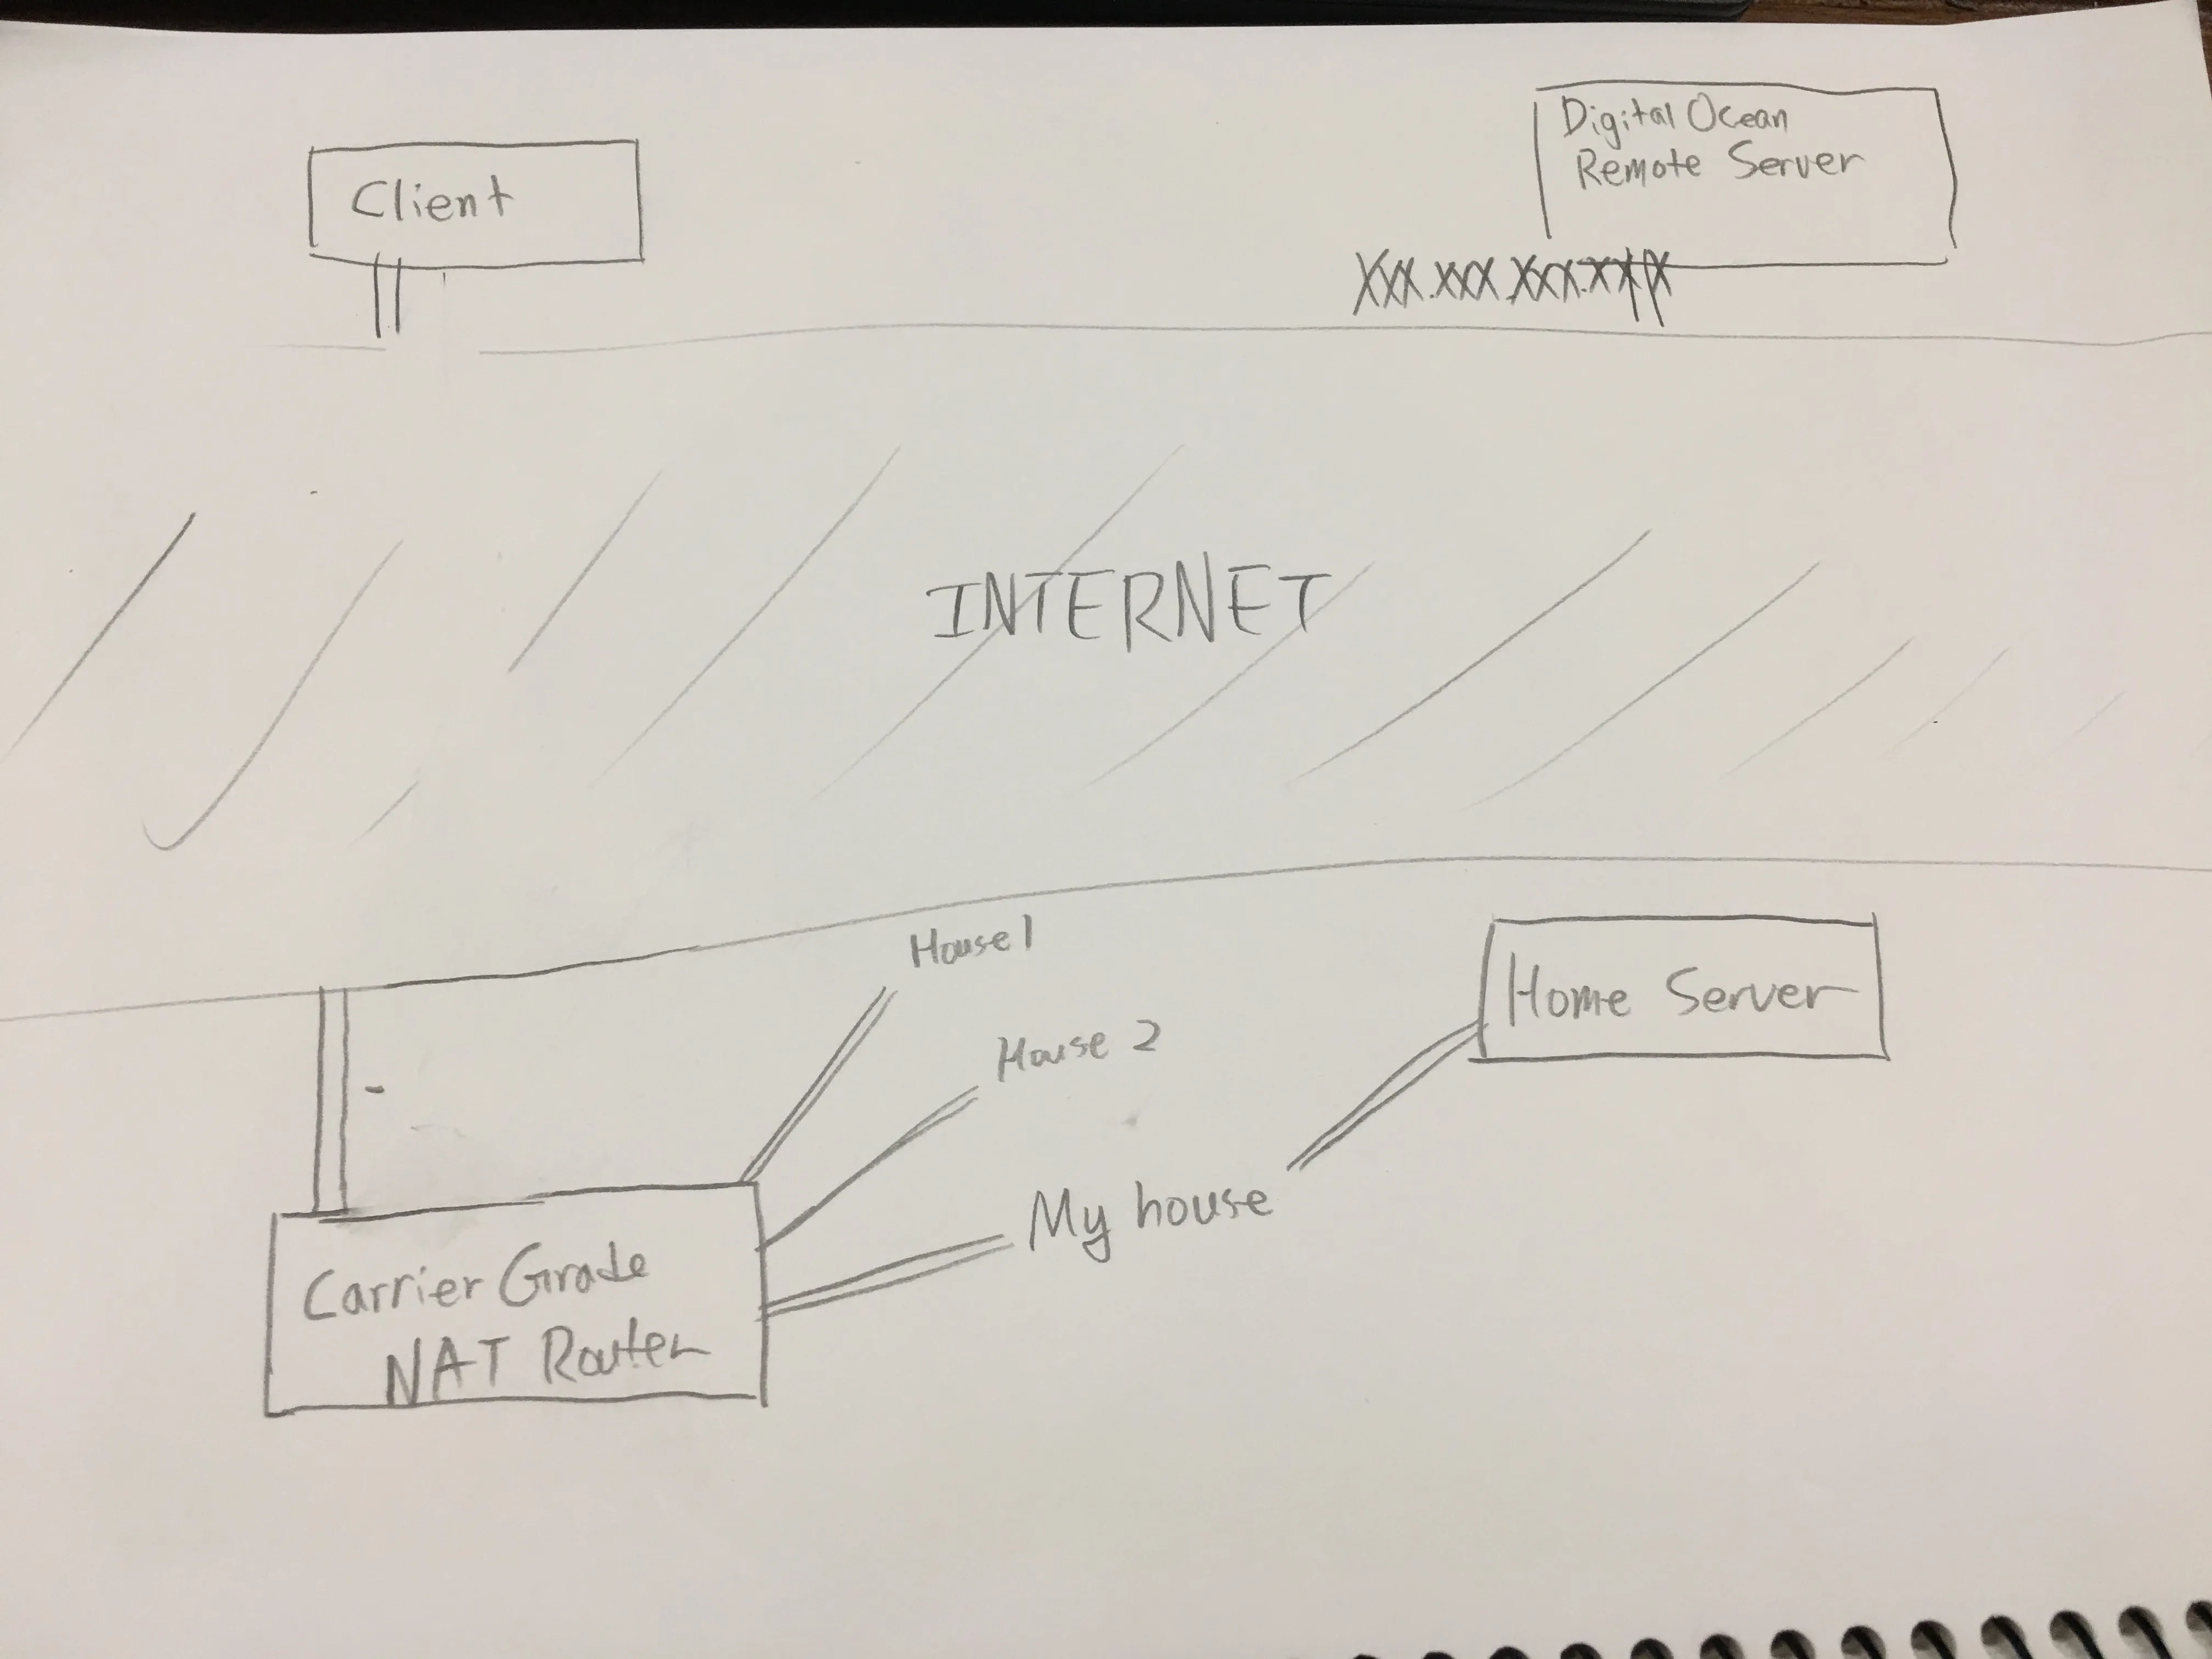
1. DigitalOcean
You need a remote server to get started. I chose a VPS, because it is simple and easy to just spin up an instance. Hop onto DigitalOcean, make an account, link a credit card, and spin up an instance. Size doesn’t really matter - I chose the smallest instance on there, which is $5 a month.
Note down the IP address of your instance. From now on, I will be expressing this IP as XXX.XXX.XXX.XXX.
2. Server setup
Connect to your server using ssh. Do any server-maintenance stuff you need to do. I recommend this quick start article from DigitalOcean to add a sudo user to your server. After you’ve set up your server and secured it enough, proceed to the next step. I won’t be going into detail on server hardening, because that’s a topic for another day.
Then, you want to modify /etc/ssh/sshd_config, assuming you chose Ubuntu when you set up your VPS instance. Inside there, find the line named #GatewayPorts no and change it to GatewayPorts yes(remove the hash in the front and change no to yes.)
Save, exit, and type sudo service sshd restart. In theory you shouldn’t get kicked off from the server, but if you do, just reconnect. Finally, restart the server.
3. Client setup
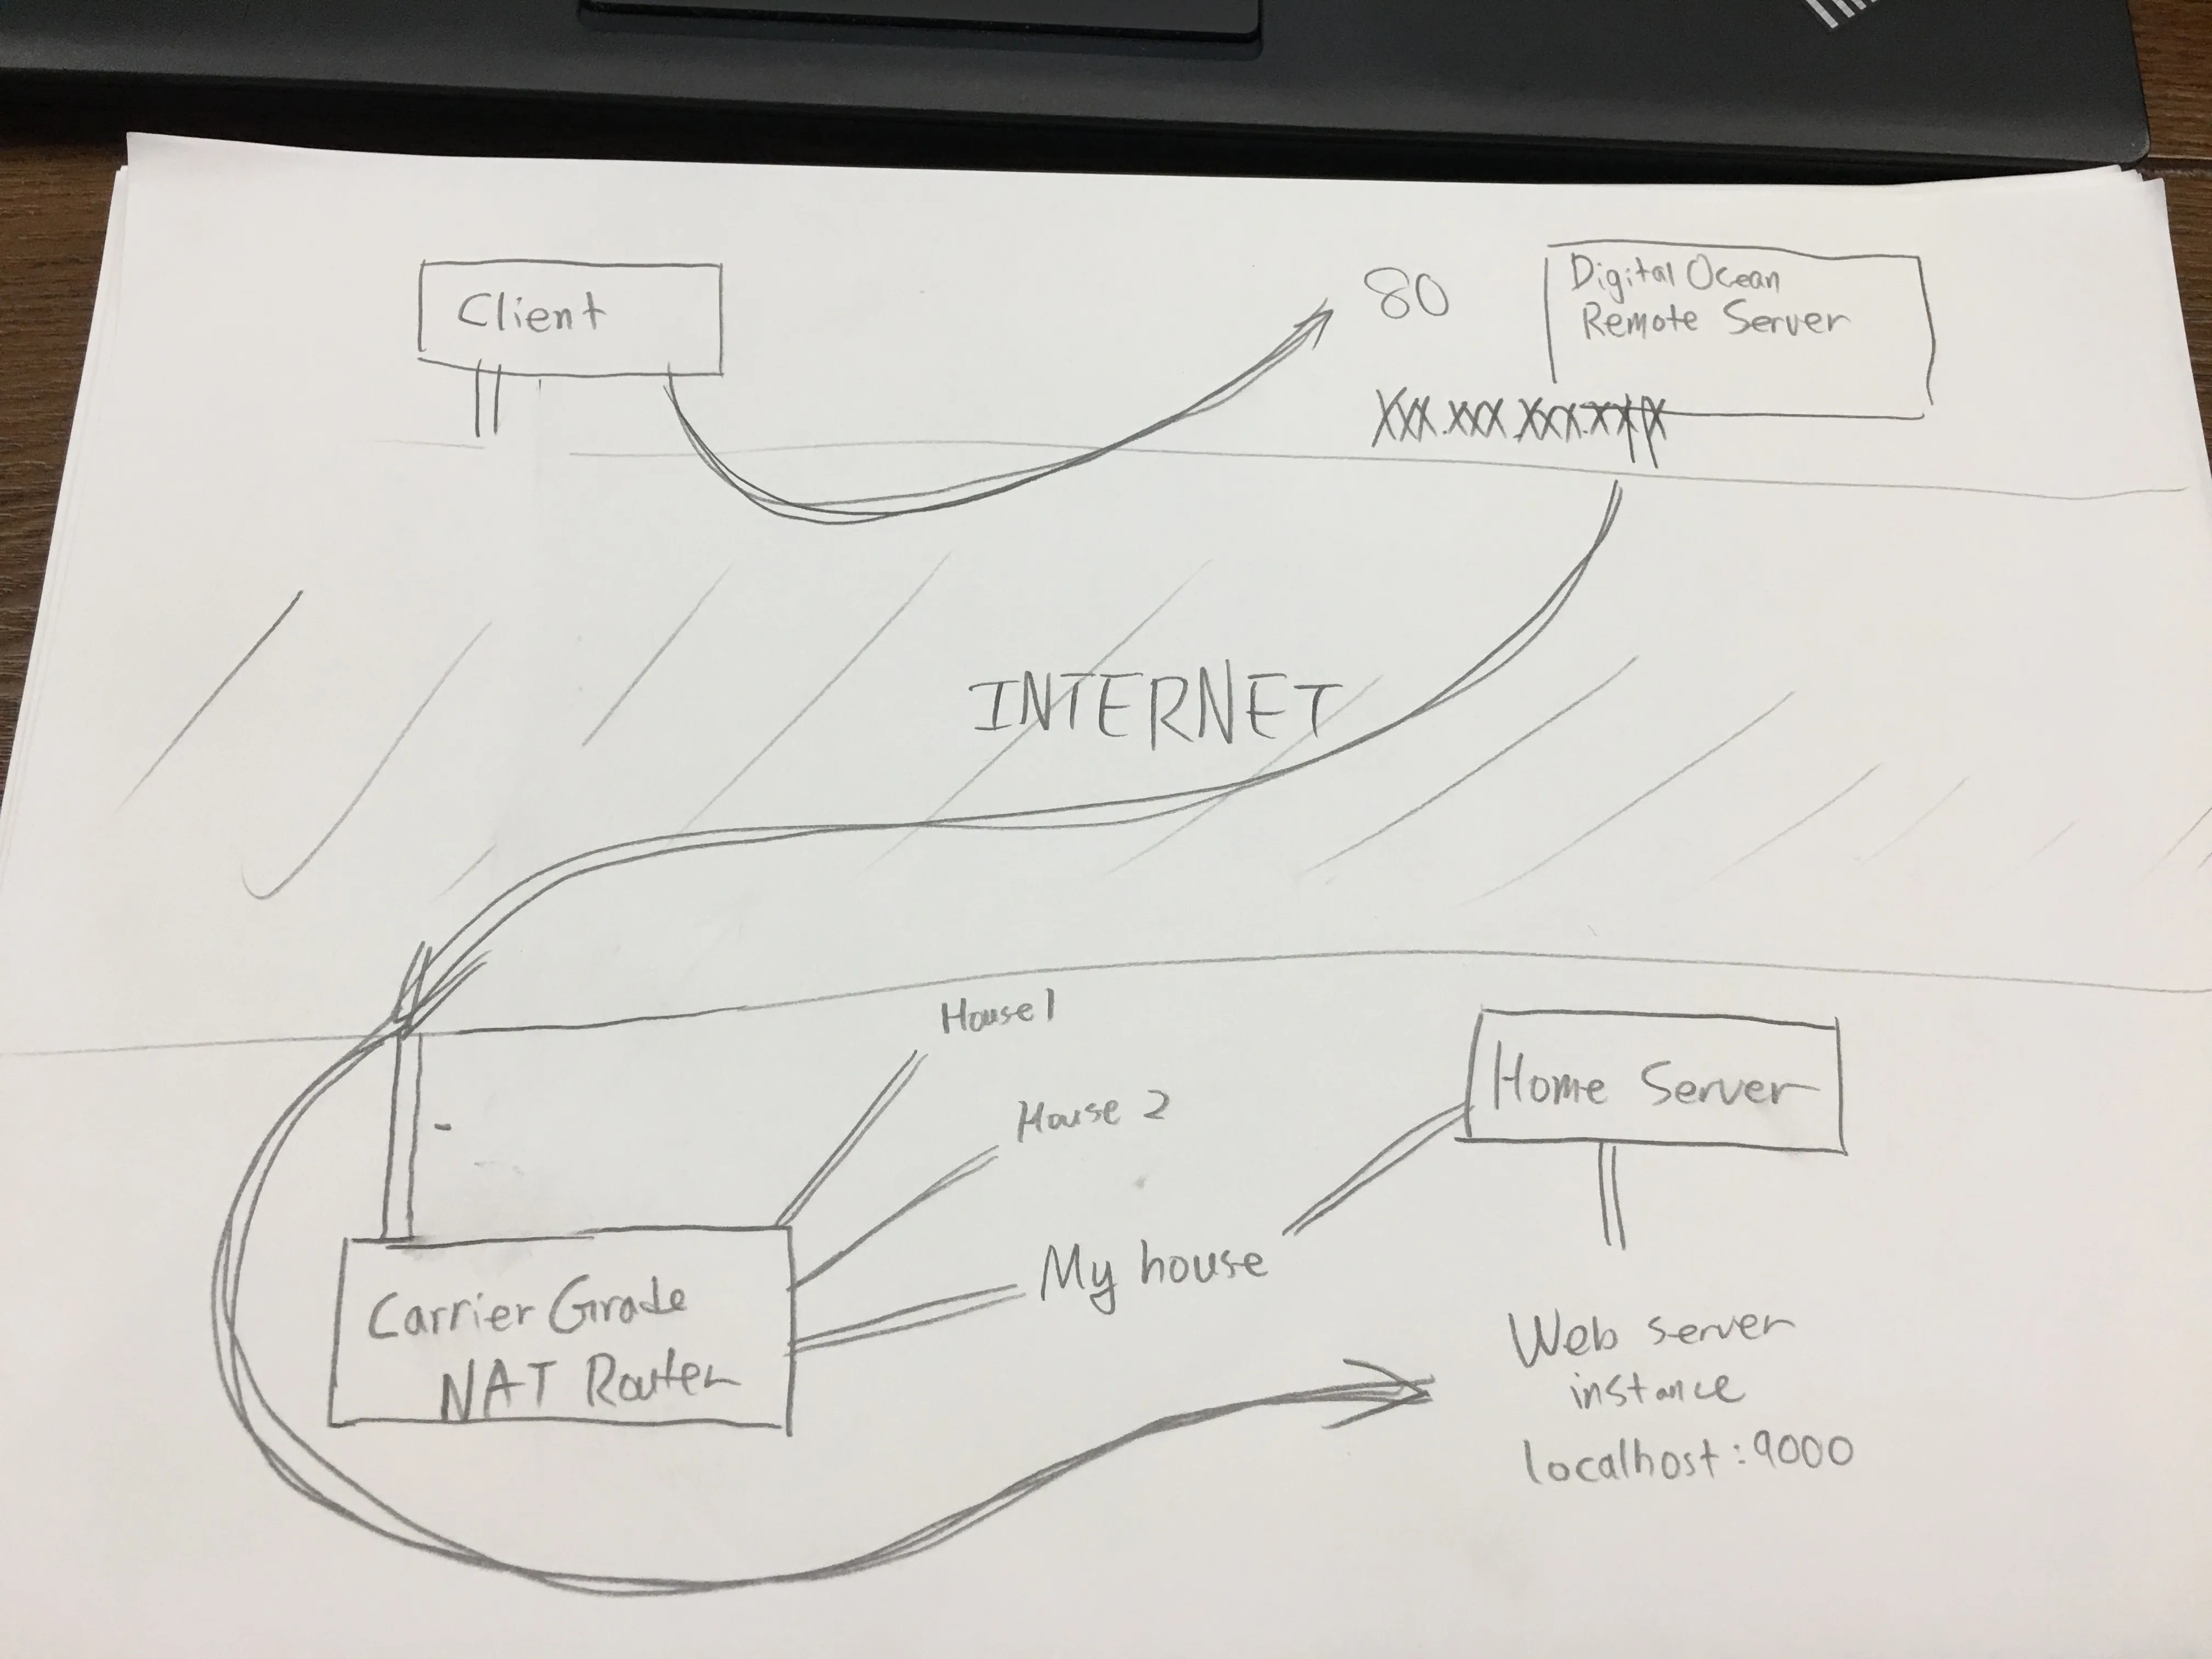
Let’s say you have a port you want to forward on localhost, port 9000. You want to make it so that when you connect to the remote server, you could access it on port 80.
Client –> Remote server XXX.XXX.XXX.XXX (port 80) –> Home Server –> Web instance (port 9000)
To do that, on the home server type this SSH command:
ssh -nNT -R 80:localhost:9000 username@XXX.XXX.XXX.XXXLet’s dissect this command. ssh is the program name itself, -nNT instructs SSH to not create a TTY instance (so you will NOT get a Terminal prompt), -R tells SSH we want to make a remote port forward, 80 is the port the remote server will be listening on, localhost is the IP the home server will forward requests to (in this case, it’ll be itself), 9000 would be the port that the home server would listen on, and the rest (username@XXX.XXX.XXX.XXX) is just the typical SSH details to connect to a server.
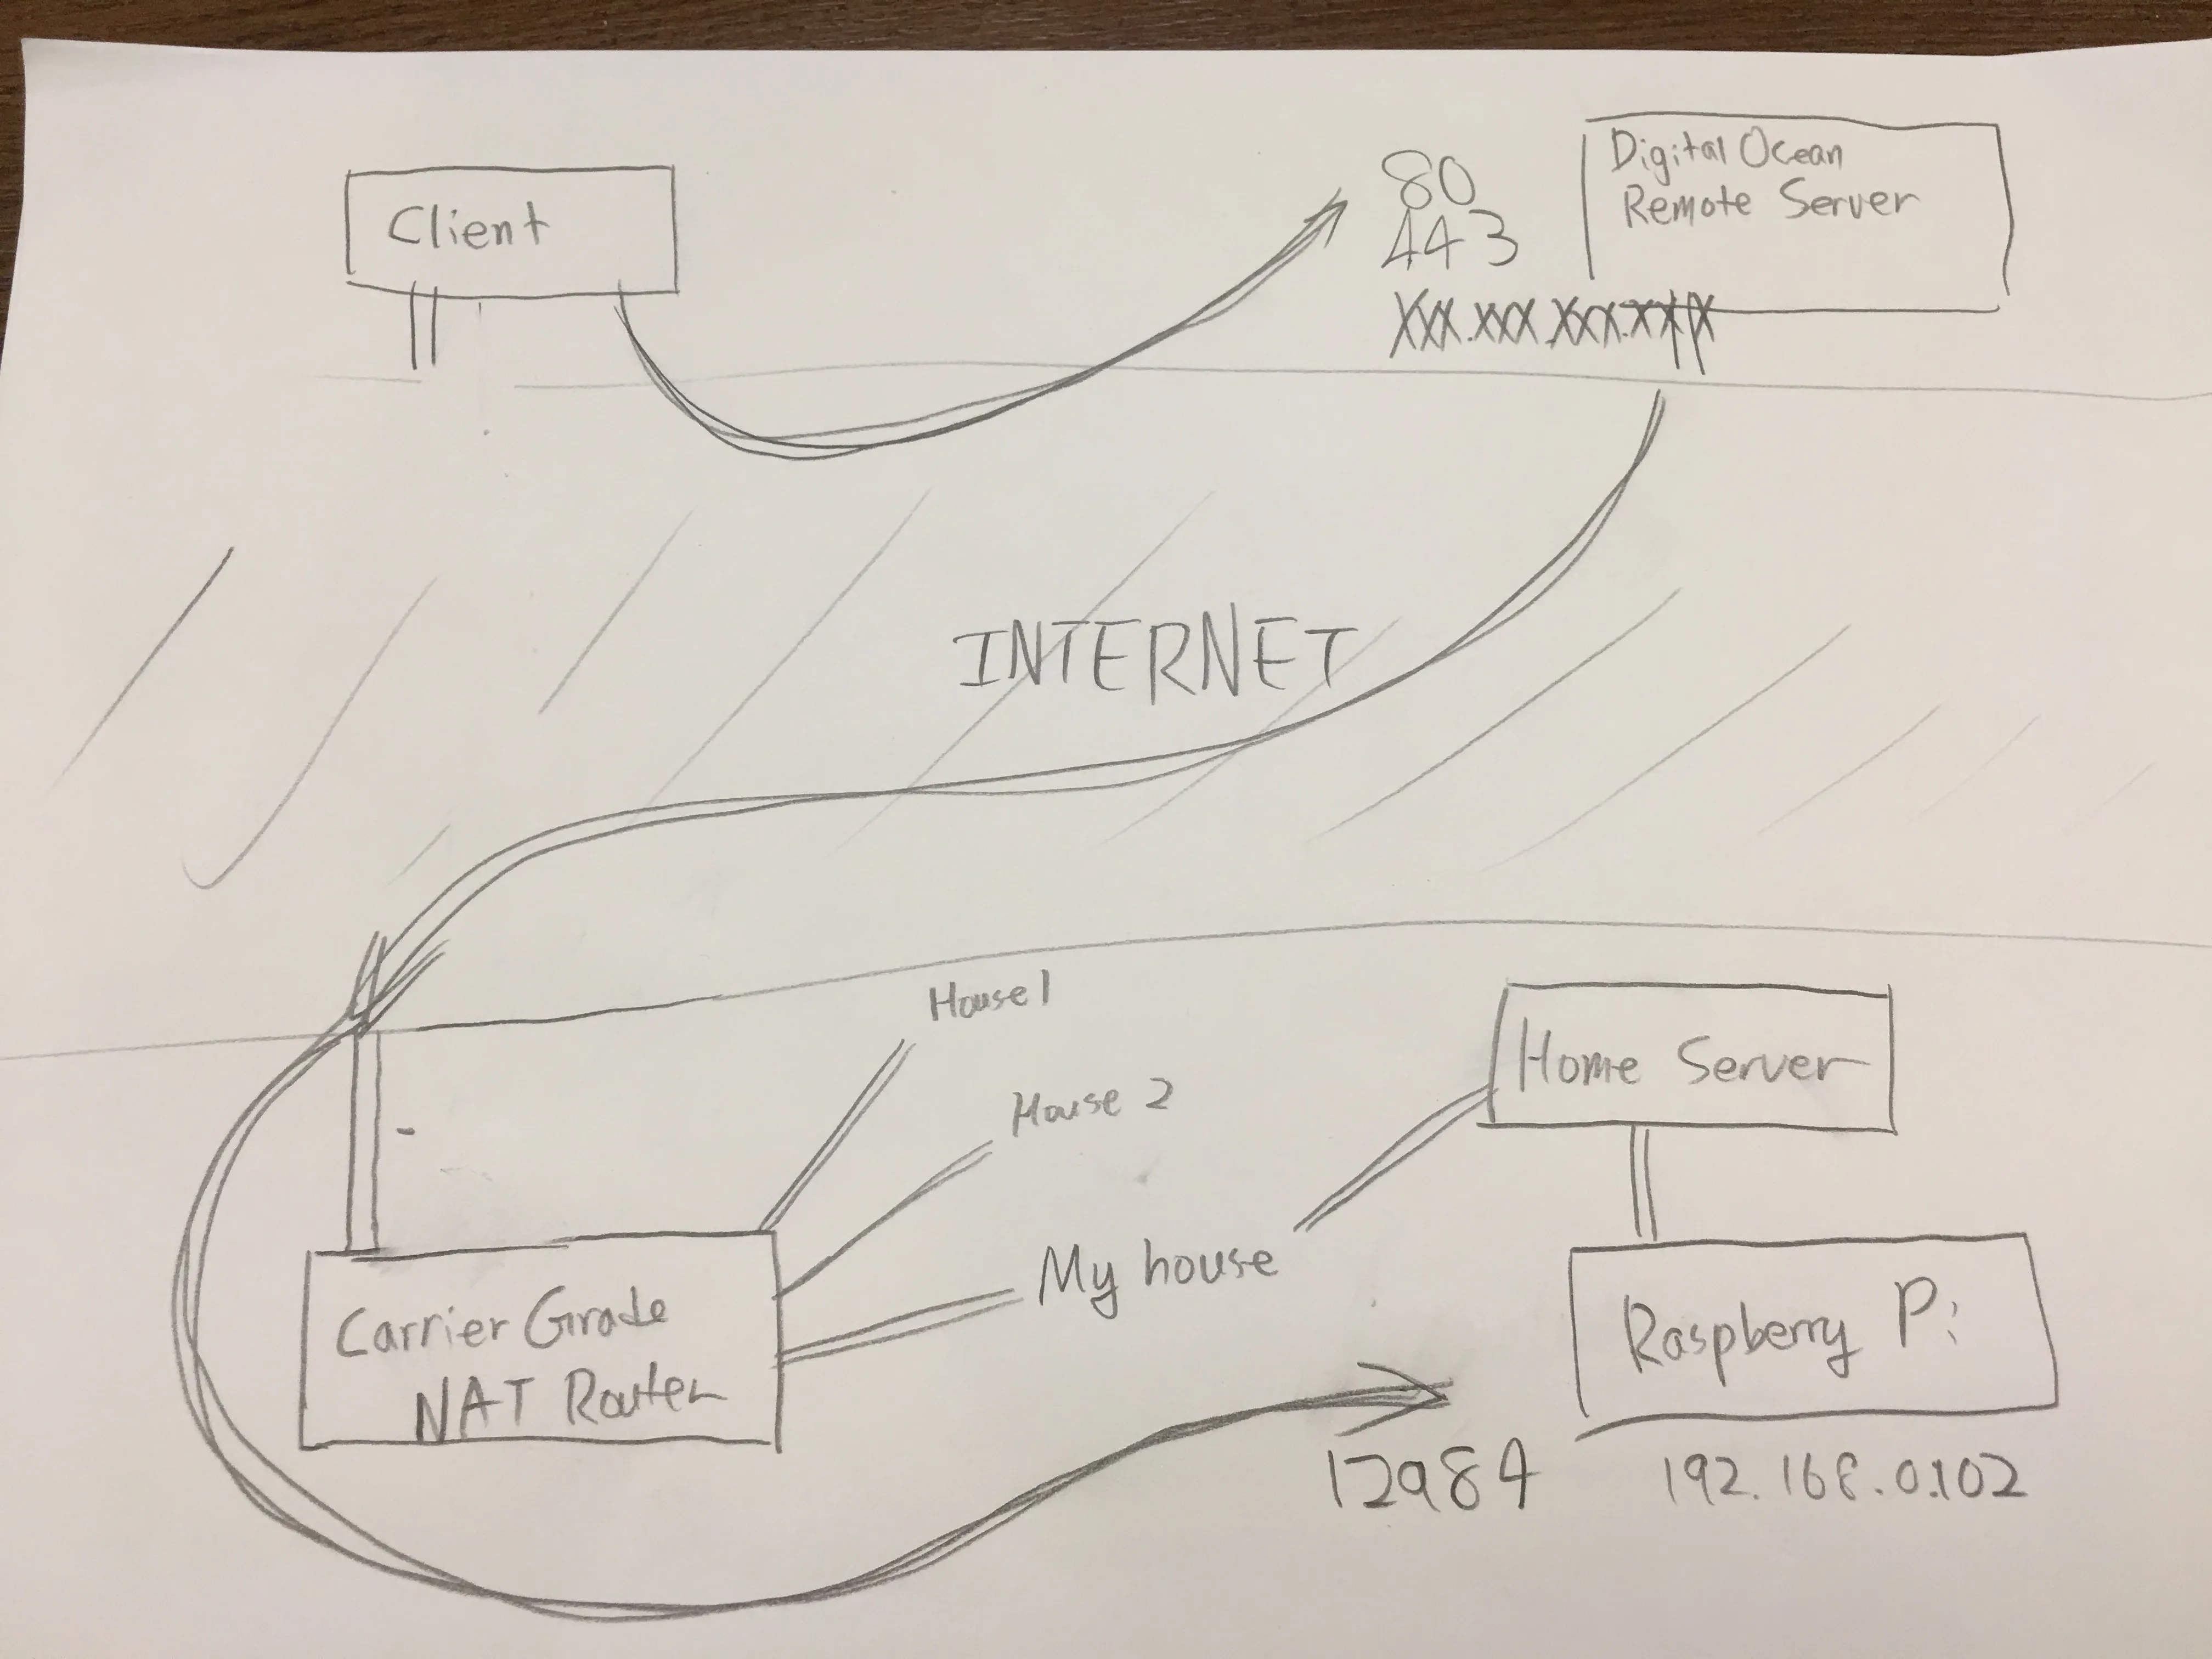
Boiling all this down to a practical example, I have a instance with an IP address of 192.168.0.102 on my local network, such as a Raspberry Pi. It is listening on port 12984 and is hosting a web server. I want to see my website pop up when I connect to the remote server, so we would have to use port 80 or even port 443. To access this through a reverse tunnel, I would have to use this command on my home server:
ssh -nNT -R 80:192.168.0.102:12984 username@XXX.XXX.XXX.XXX # HTTP
ssh -nNT -R 443:192.168.0.102:12984 username@XXX.XXX.XXX.XXX # HTTPS
ssh -nNT -R 80:192.168.0.102:12984 -R 443:192.168.0.102:12984 username@XXX.XXX.XXX.XXX # or all in one
And this would be the diagram for how it would work:
4. AutoSSH
Sure, you could type these commands out every time you want a bridge! But personally, I’m lazy, and I want a script that does it for me every boot.
That’s where AutoSSH comes in.
sudo apt install autosshChange to fit your distribution. In this case, I’m using Ubuntu Server. Then, we need to make a systemd configuration file.
nano /etc/systemd/system/autossh-tunnel.servicePaste the following in, adapting it for your use:
[Unit]
Description=AutoSSH tunnel service
After=network.target

[Service]
Environment="AUTOSSH_GATETIME=0"
ExecStart=/usr/bin/autossh -M 0 -o "ServerAliveInterval 30" -o "ServerAliveCountMax 3" -o "ExitOnForwardFailure yes" -N -R 80:192.168.0.1:80 -R 443:192.168.0.1:443 root@server.example.com -p 22 -i /home/example/.ssh/private-key

[Install]
WantedBy=multi-user.target
Then tell systemd to look for new configuration, and then enable the configuration:
sudo systemctl daemon-reload
sudo systemctl start autossh-tunnel.service
sudo systemctl enable autossh-tunnel.service
If you want to configure how SSH connects to the server, you could utilize ~/.ssh/config:
Host example-tunnel
    HostName server.example.com
    User example
    Port 22
    IdentityFile ~/.ssh/private-key
    RemoteForward 80 192.168.0.1:80
    RemoteForward 443 192.168.0.1:443
    ServerAliveInterval 30
    ServerAliveCountMax 3
    ExitOnForwardFailure yes
You don’t really need to specify RemoteForward here since AutoSSH will take care of that for you anyway, but I just put it there for peace of mind.
For more information, you could check out this great guide over here. I learnt a lot from that post, so thanks to the authors of that guide!