Use NSSavePanel in Swift
2018-02-28
TL;DR:
@IBAction func browseDirectory(_ sender: Any) {

    let dialog = NSSavePanel()

    dialog.title = "Save file"
    dialog.showsResizeIndicator = true
    dialog.canCreateDirectories = true
    dialog.showsHiddenFiles = true
    dialog.allowedFileTypes = ["txt"]

    if (dialog.runModal() == NSApplication.ModalResponse.OK) {
        let result = dialog.url

        if (result != nil) {
            let path = result!.path // Do stuff with 'path' variable
        }
    } else {
        return // User clicked cancel
    }
}
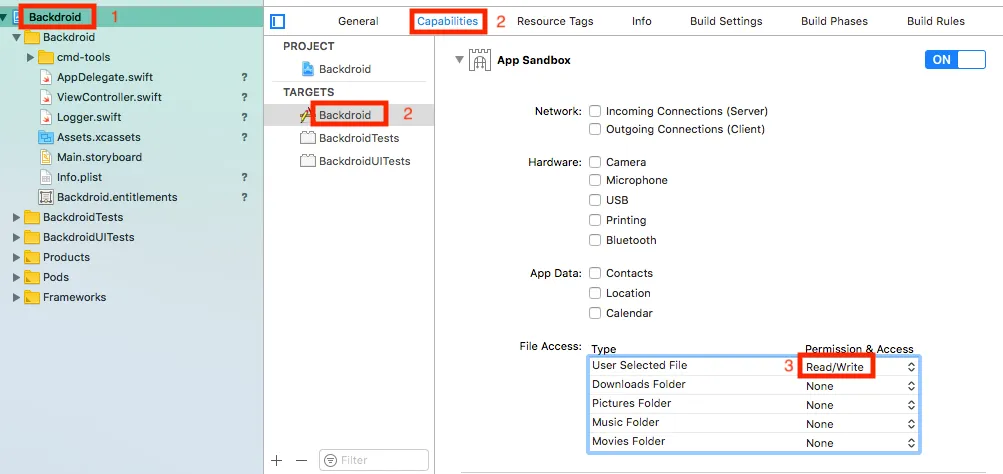
Don’t forget to allow the app to access the filesystem.
Okay, we need to make a dialog, so let’s make a variable named dialog and assign it the NSSavePanel.
let dialog = NSSavePanel()Then we have to set some parameters. Let’s give the dialog a title-bar name.
dialog.title = "Save file"The parameter names are pretty self-explanatory, but these options are for showing the “resize” button in the title bar, allowing users to create new folders, and showing hidden files.
dialog.showsResizeIndicator = true
dialog.canCreateDirectories = true
dialog.showsHiddenFiles = true
If you want to restrict users so that they can only select certain files:
dialog.allowedFileTypes = ["php"]We then expose the dialog to the users:
if (dialog.runModal() == NSApplication.ModalResponse.OK) {
    let result = dialog.url

    if (result != nil) {
        let path = result!.path // Do stuff with 'path' variable
    }
} else {
    return // User clicked cancel
}
Great, so we’re done now, right? Not so fast! If you run your app now, it will crash. What gives? Well, you forgot to allow the app access to your filesystem! Simply click on your project on the left sidebar, press on your app under the smaller sidebar with the title-name “Targets”, choose “Capabilities” on the top bar, and then choose Read/Write under “User Selected File”.

You should now have a functional save panel!